Tutorial: What does Blend-If do in Photoshop
In this tutorial, I’ll show you what “Blend-If” does in Photoshop CC 2023, and how you can use it.
Introduction
Hello there fellow photographer! In this blogpost I’m going to take a look at what Blend-If does in its most basic form and how it is incredibly powerful for all kinds of photography editing. Are there other ways how to achieve something similar? Of course, in Photoshop there are always many ways. However, for me Blend-If is one of the few go-to functions, which I use almost in every edit.
In short: with Blend-If you can target your adjustments to certain parts of your image. In order to understand this tutorial, you need some very basic knowledge about Photoshop, namely what layers and layermasks are, and what they do in Photoshop. If this is new for you, read up on this beforehand.
As usual you can get a cheat sheet with summarized steps at the end of this blogpost. But first, let’s get into the more elaborate explanation of what Blend-if does along with a few select use cases.
What Is Blend-If doing?
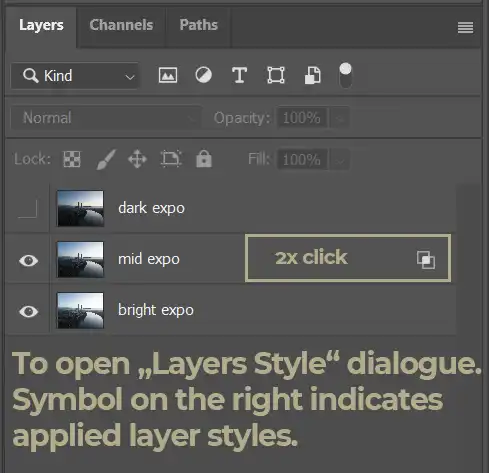
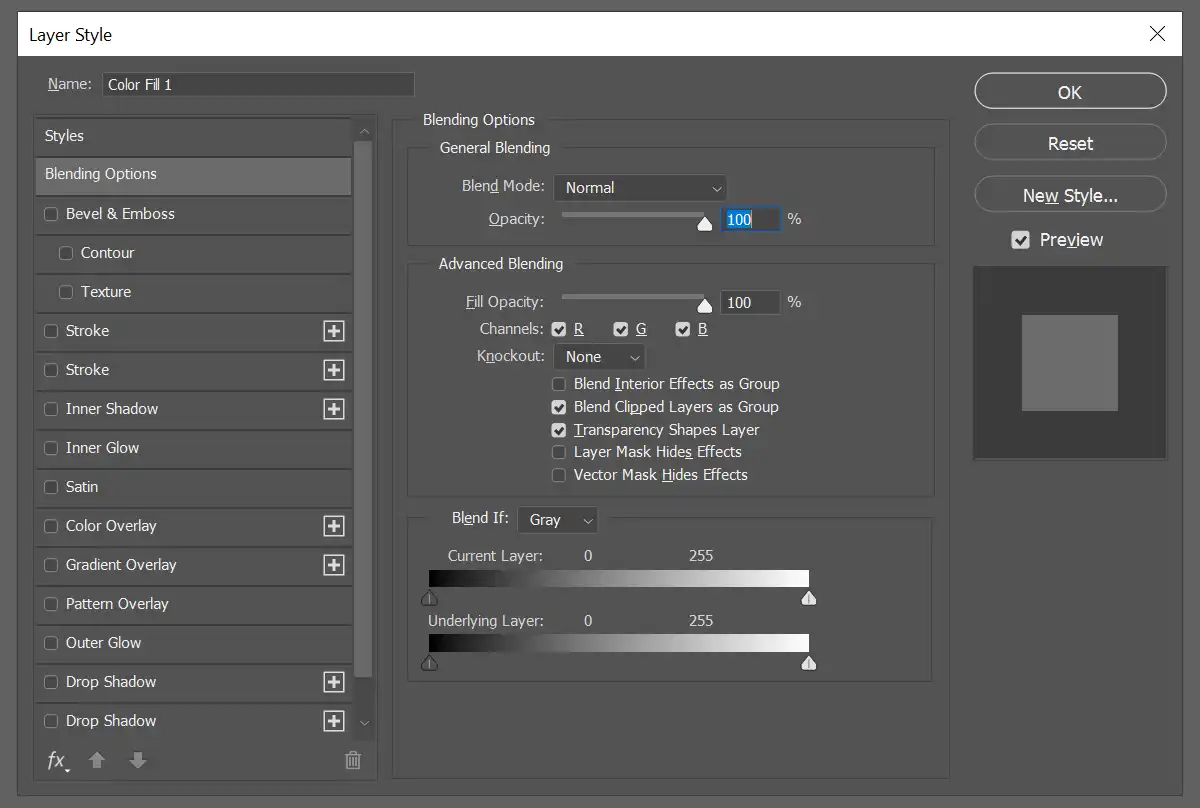
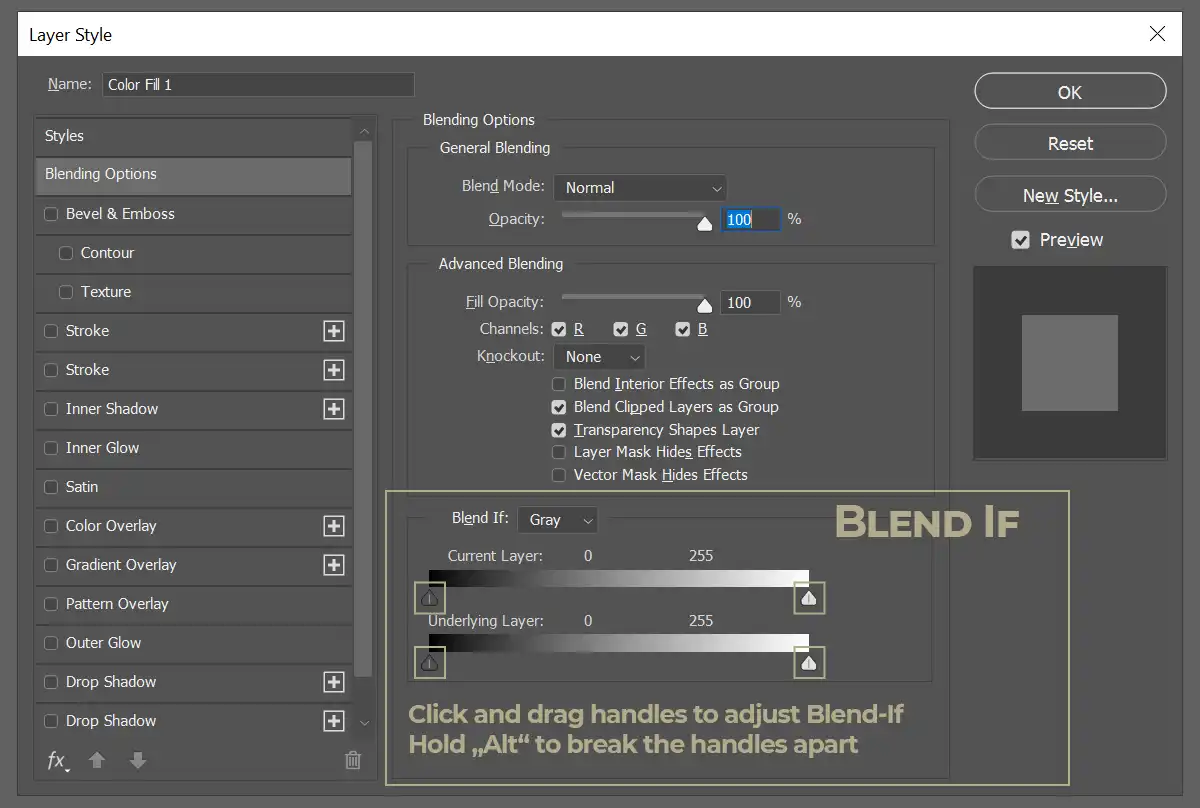
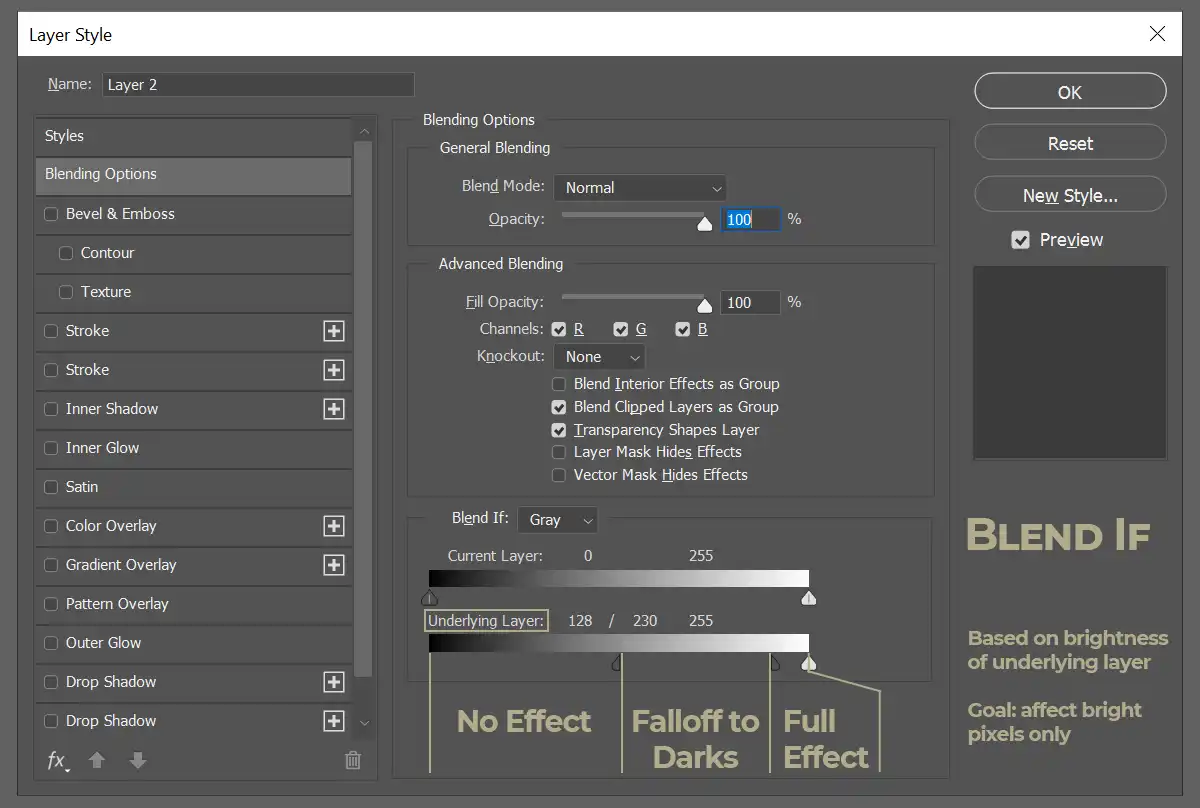
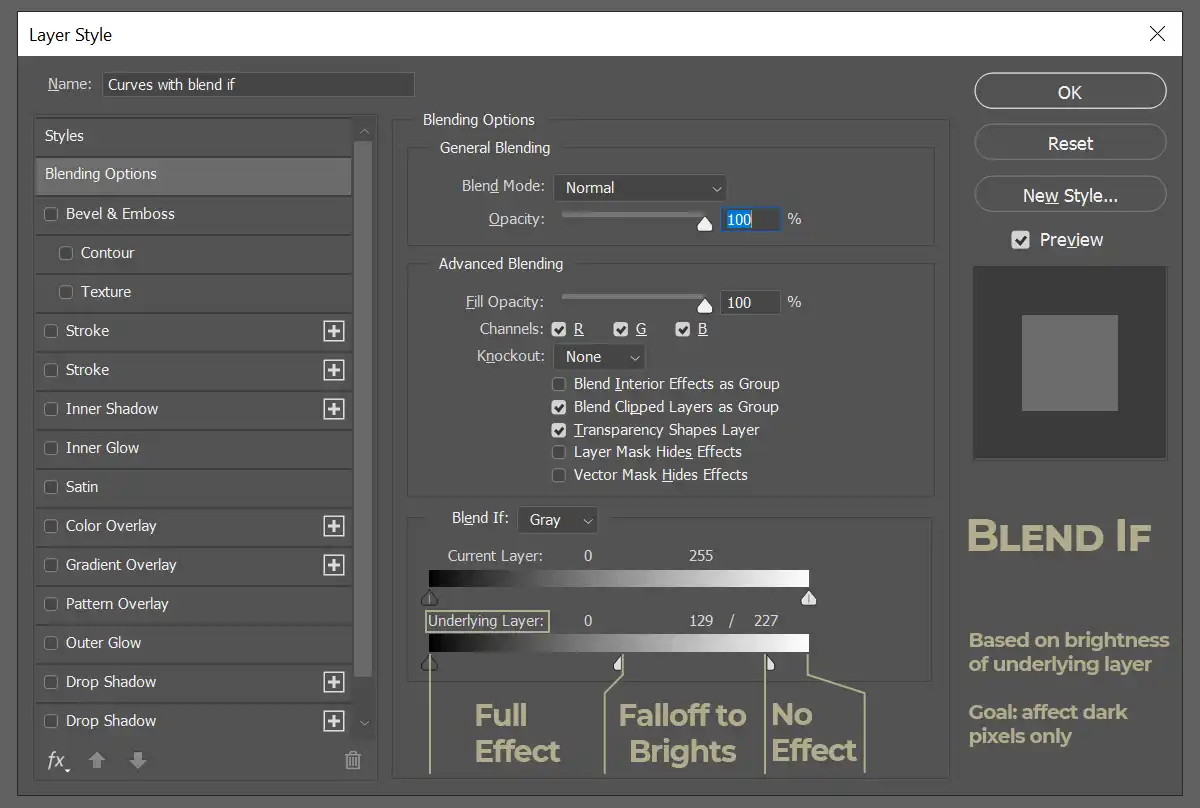
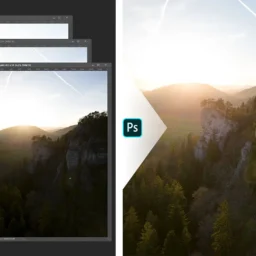
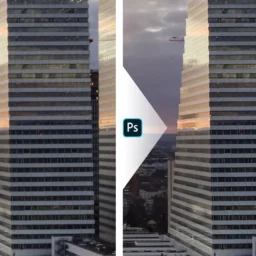
Blend-If is part of the “Layer Style” dialogue. You can open it by double clicking on the right side of a layer in your layer stack, as indicated in the next image.
The dialogue contains many more options, but in this tutorial we are only looking at the function of Blend-If. Use the slider to reveal all the information on the blend-if part.
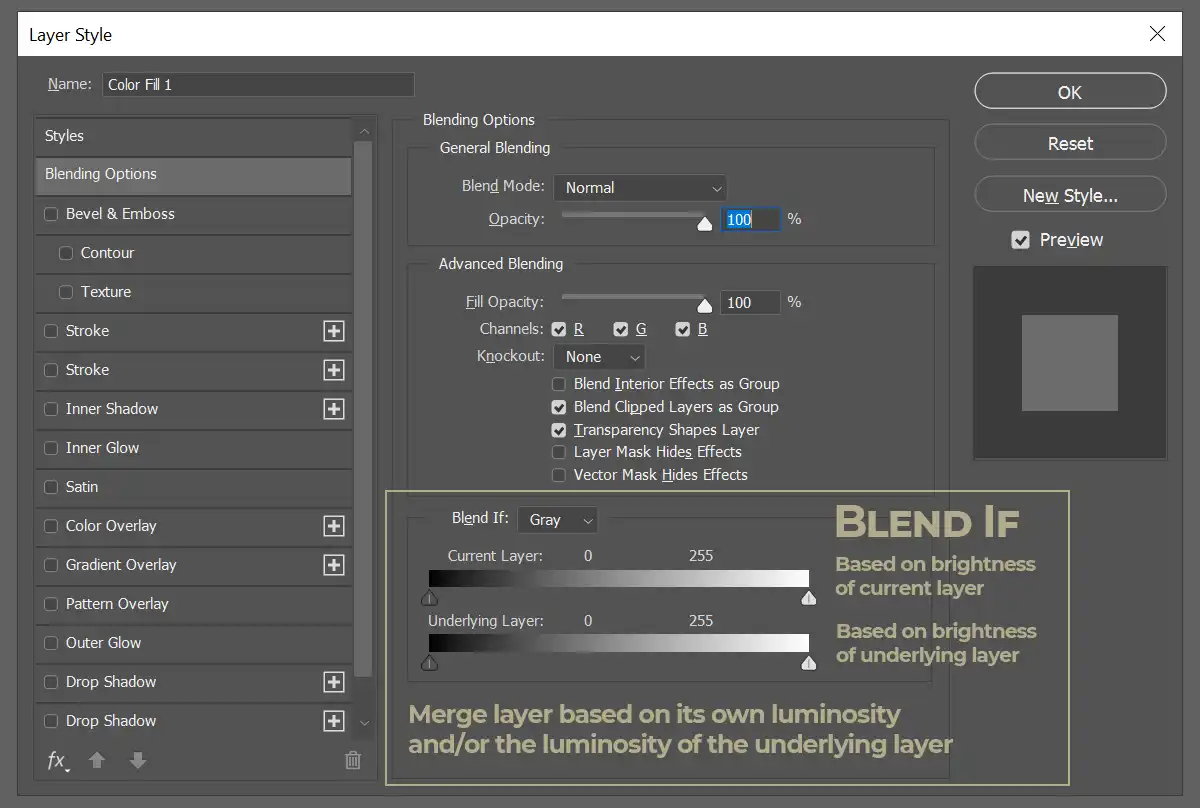
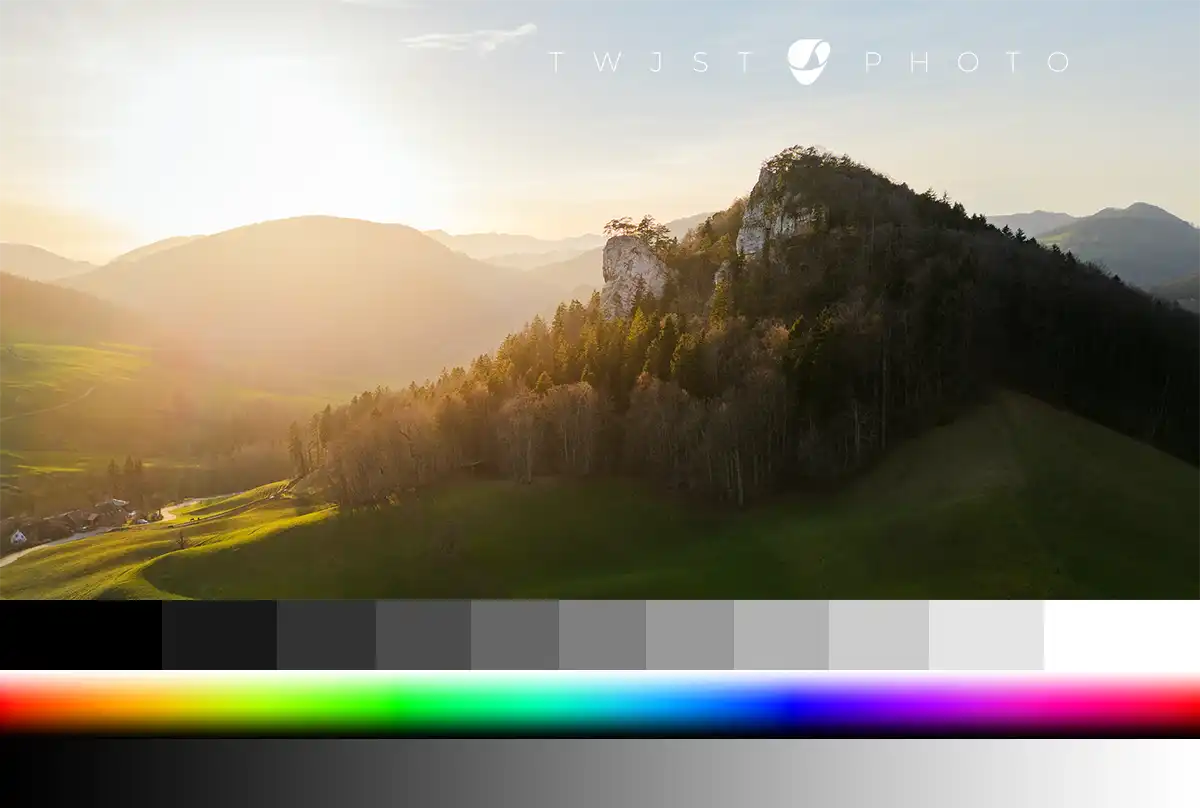
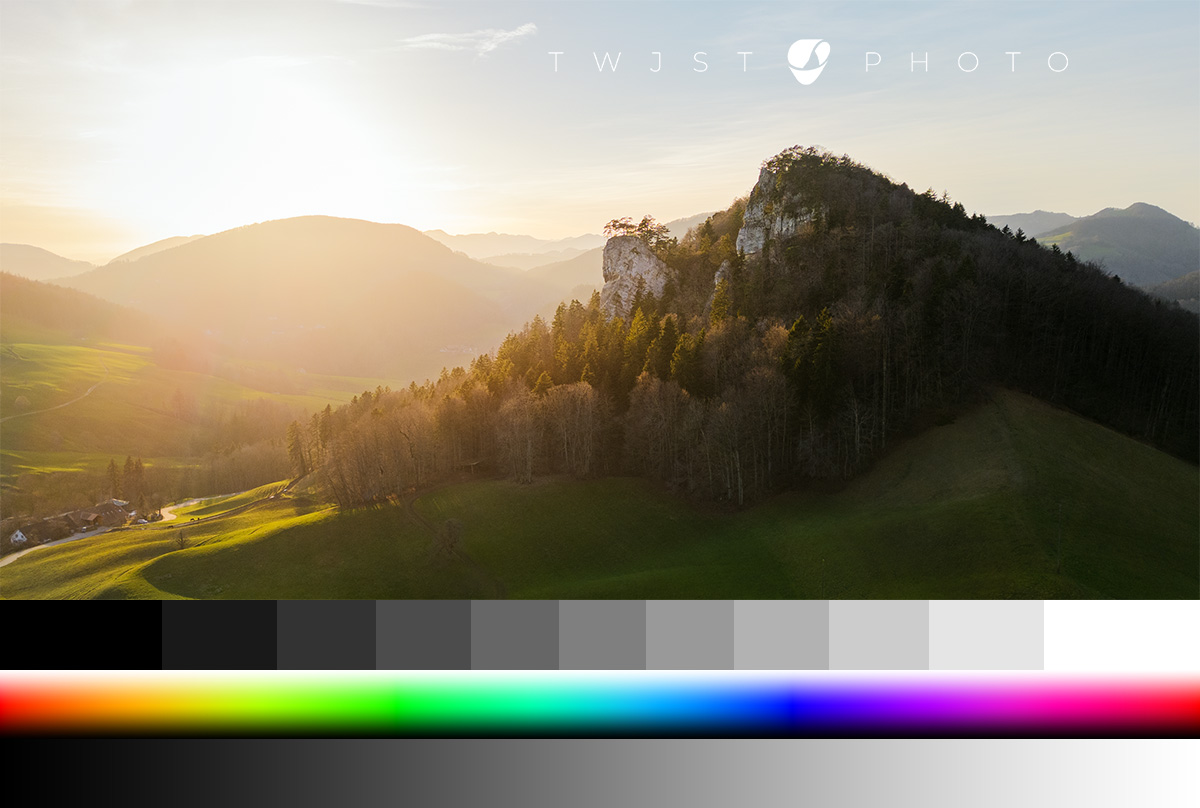
Blend-If is a tool that gives you the option to limit a layer based on its own luminosity and/or the luminosity of the underlying layer. To explain to you what this means, let me start with a layer stack of two layers: 1) a test image containing a photograph, a black to white gradient, and a color gradient 2) a solid color adjustment layer on top of it.
Learn How to Use Blend-If
If you want to follow along, you can download the test-image for your own use right here. After opening the image in photoshop, add a solid color adjustment layer (Layer > New Fill Layer > Solid Color) and choose a vibrant pink color.

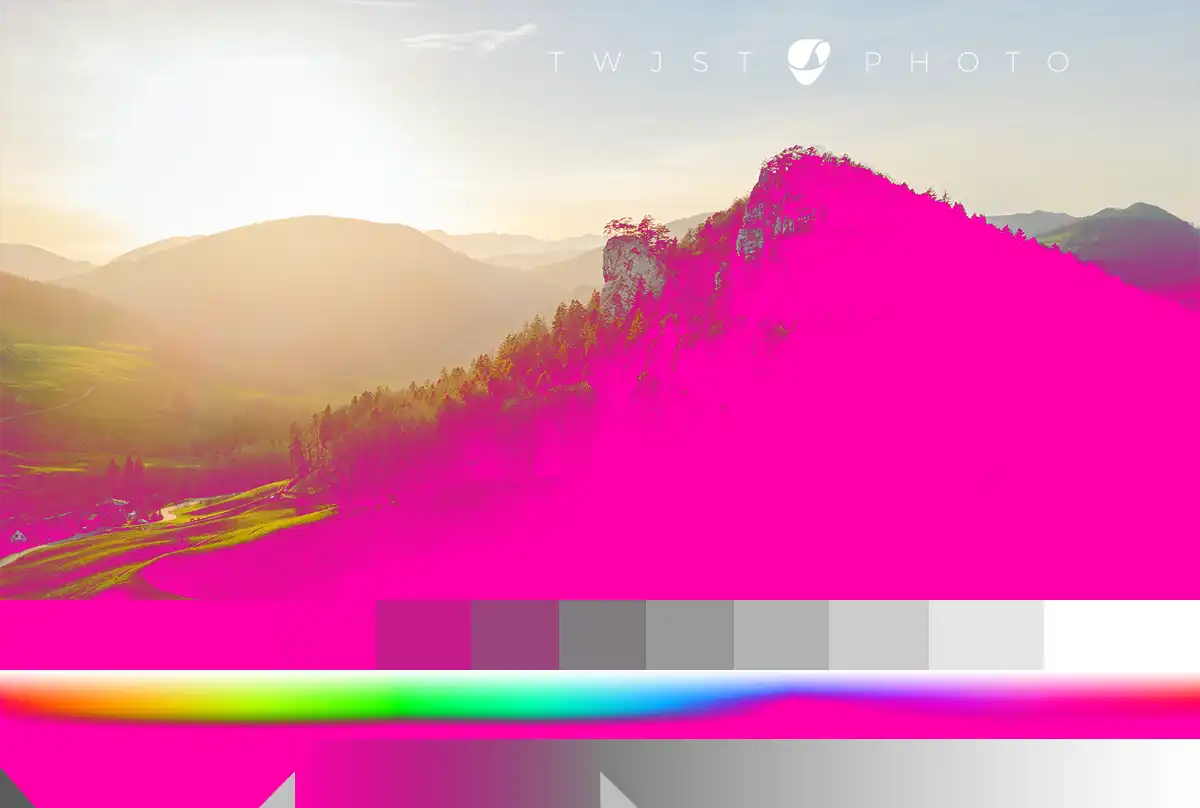
At this point you may ask yourself, whether I’ve gone mad and why anyone would do such a thing. Don’t worry, in this case it’s just to illustrate what blend-if is doing. In this state, no changes have been made in the “Layer Style” dialogue. Because of this, only the pink solid color layer will be visible. However, look what happens once we change the Blend-If options.
In this example we will show or hide the solid color layer based on the luminosity of the underlying test-image. If you’re not sure what this means, try the following: Open the Layer-Style dialogue by double clicking on the right side of the solid-color layer. In the dialogue, move the handles on the lower bar, which is labeled “Underlying Layer”. Just click and drag the handles and find out what happens. You also have the option to “break” the handle into two parts by holding “Alt” while clicking and dragging on one side of a handle.
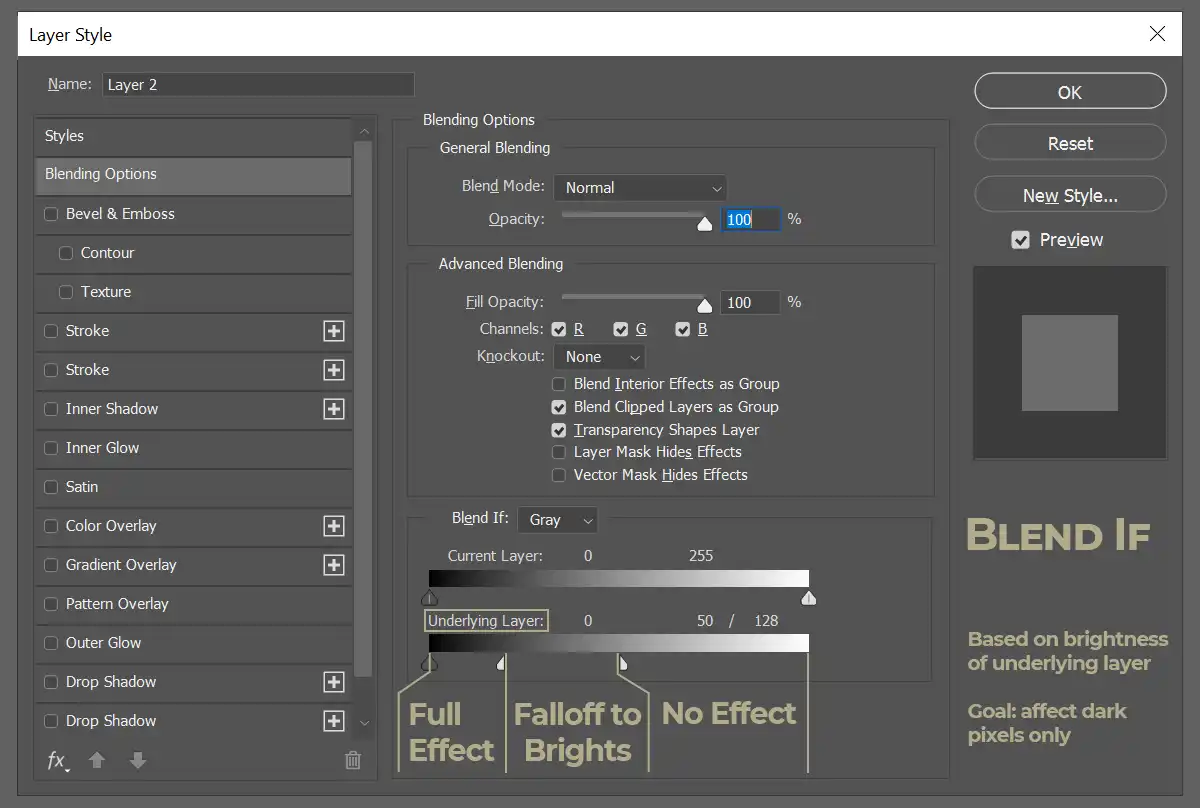
Target Dark Parts of the Image
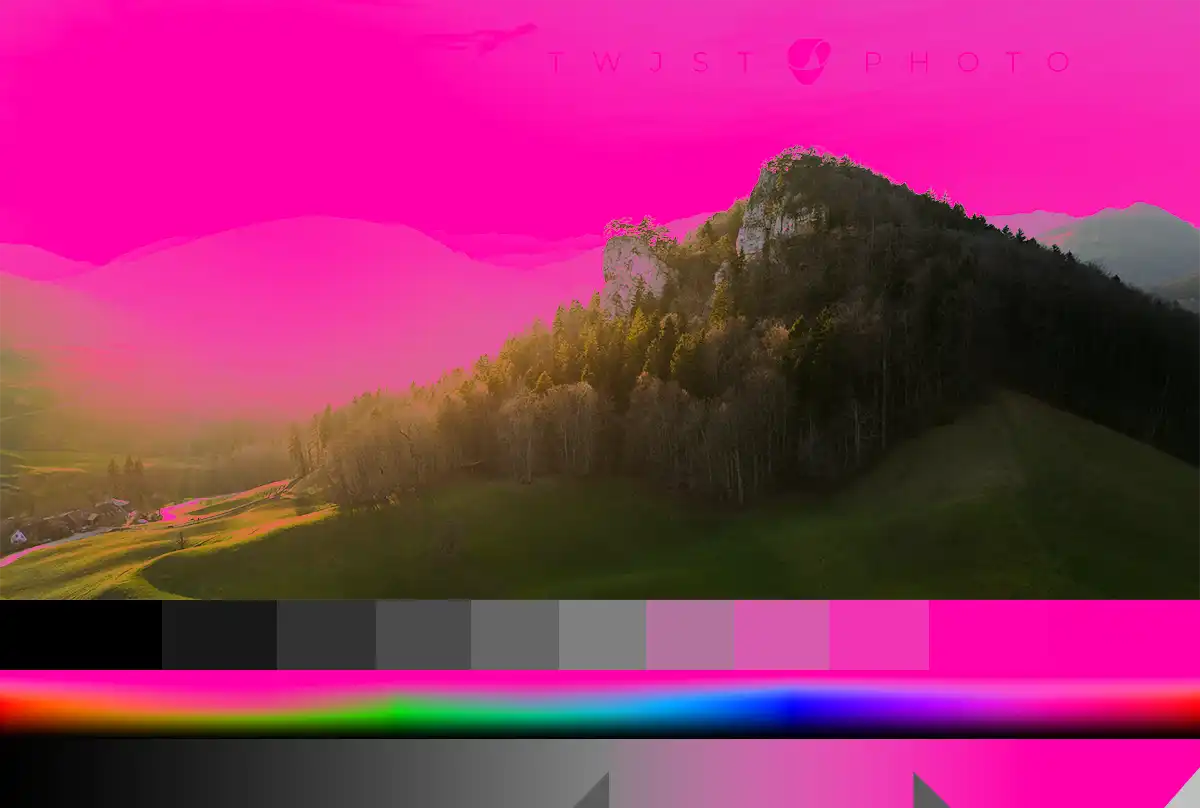
After playing around, we are going to try to direct the adjustment to specific parts of the image. First step is to limit the pink color to the dark pixels of the underlying test-image, check the settings for this. The dark handle stays firmly on the left limit (pure black), while the white handle has been moved to the left part of the scale (shadows) and has been broken apart to allow a transition instead of a hard stop.
On the lower part of the test-image, I have denoted the corresponding zones with triangles.
Have a look at the result, where all the darker pixels of the test-image are replaced by pink. There is a transition zone, where the effect is getting weaker and weaker, and finally there is no pink in the brighter parts of the image.
Target Bright Parts of the Image
We can do the opposite and limit the effect to the bright parts of the image. Again, we will break one handle apart to have a smooth transition where the effect is fading.
The result this is, that only the bright parts of the underlying image are replaced by pink. There is a softer amount of pink visible in the midtones, but none in the shadows.
Target Midtones of the Image
Last but not least, we can direct the adjustment to any zone in-between white and black. See below how I have dialed in the mid-tones of the image. In this case, very dark and very bright pixels are not affected, but everything in-between is.


Now, it’s important to understand, that the settings given here are not the right ones for every image and not for every application. This particular example is purely to demonstrate to you, how Blend-If functions. Depending on what you want to affect in your image, adjust the settings accordingly. If you have a good tonal range in your own image, it should be possible to target specific parts of your image.
There are many, many more options with blend-if, experiment what happens when you change other setting. In this blogpost I am going to limit the discussion around this simple selection of an effect to towards a certain luminosity range.
What can Blend-If be used for?
I’m going to present three use-cases, how I am using Blend-If in my photography editing. However, the possibilities of Blend-If are only limited by your imagination. If in doubt, just try!
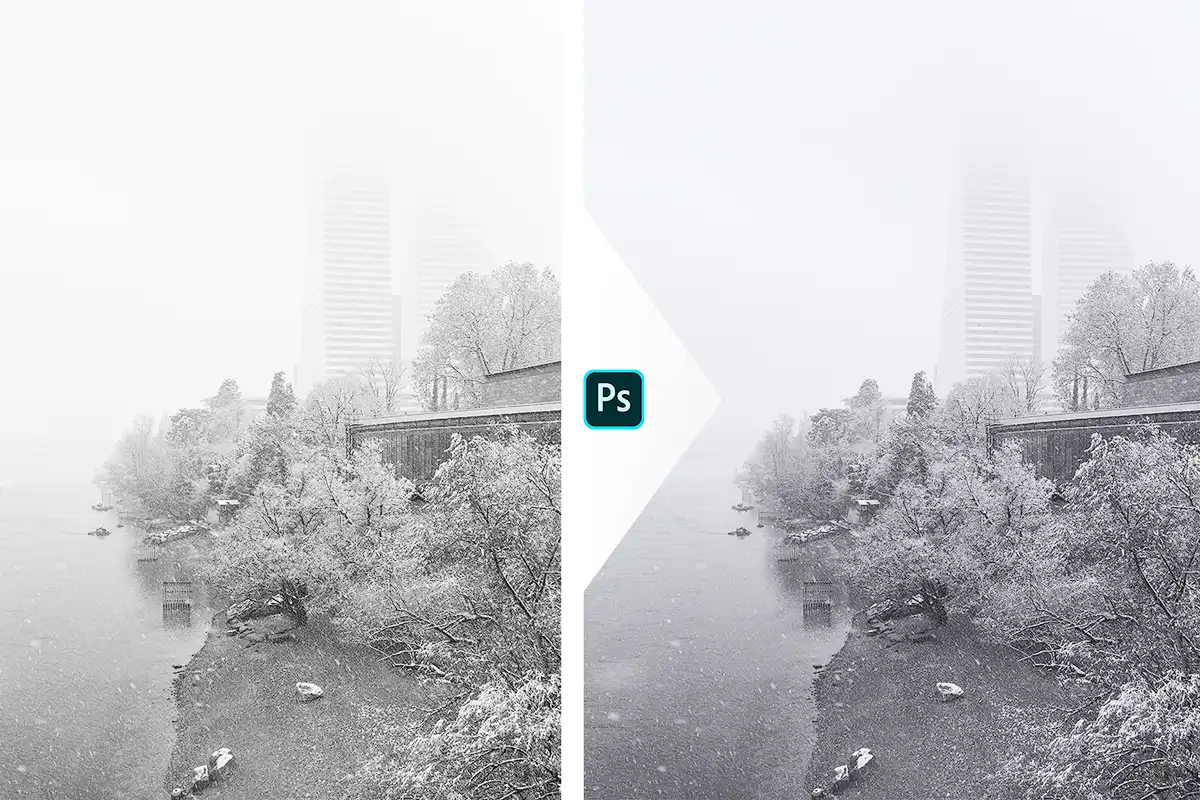
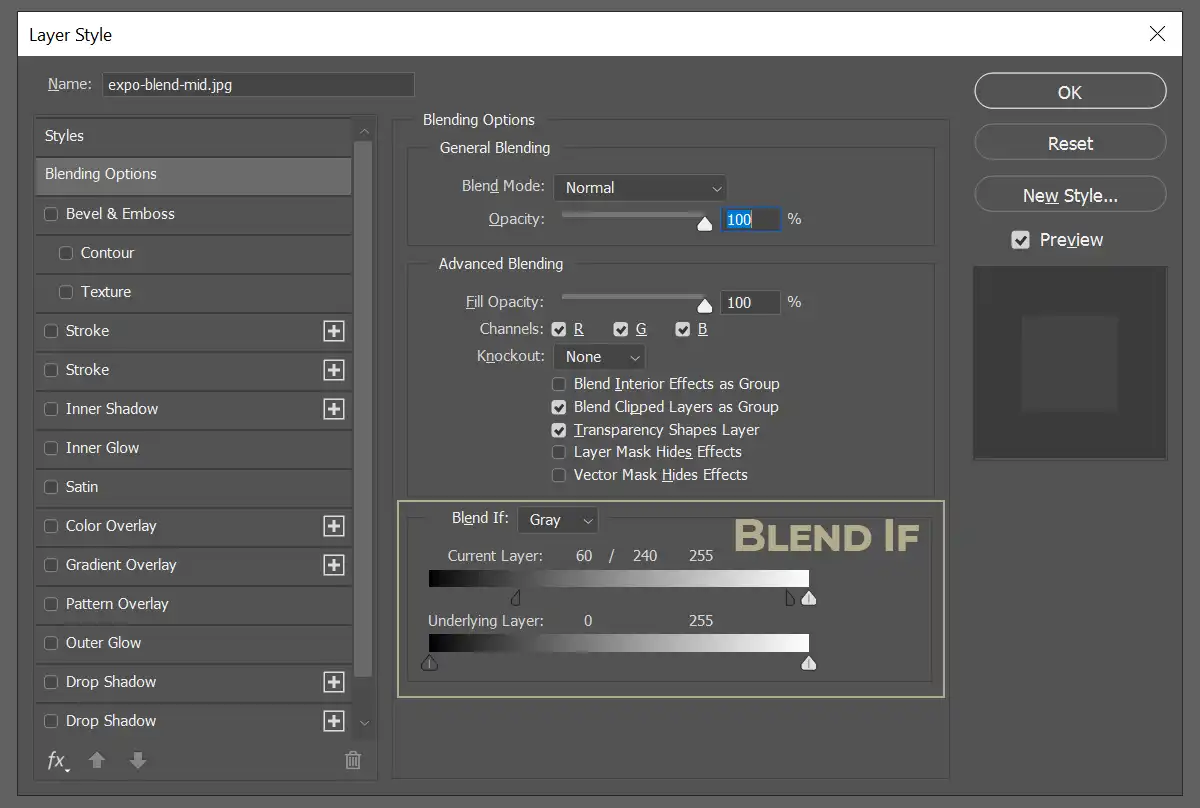
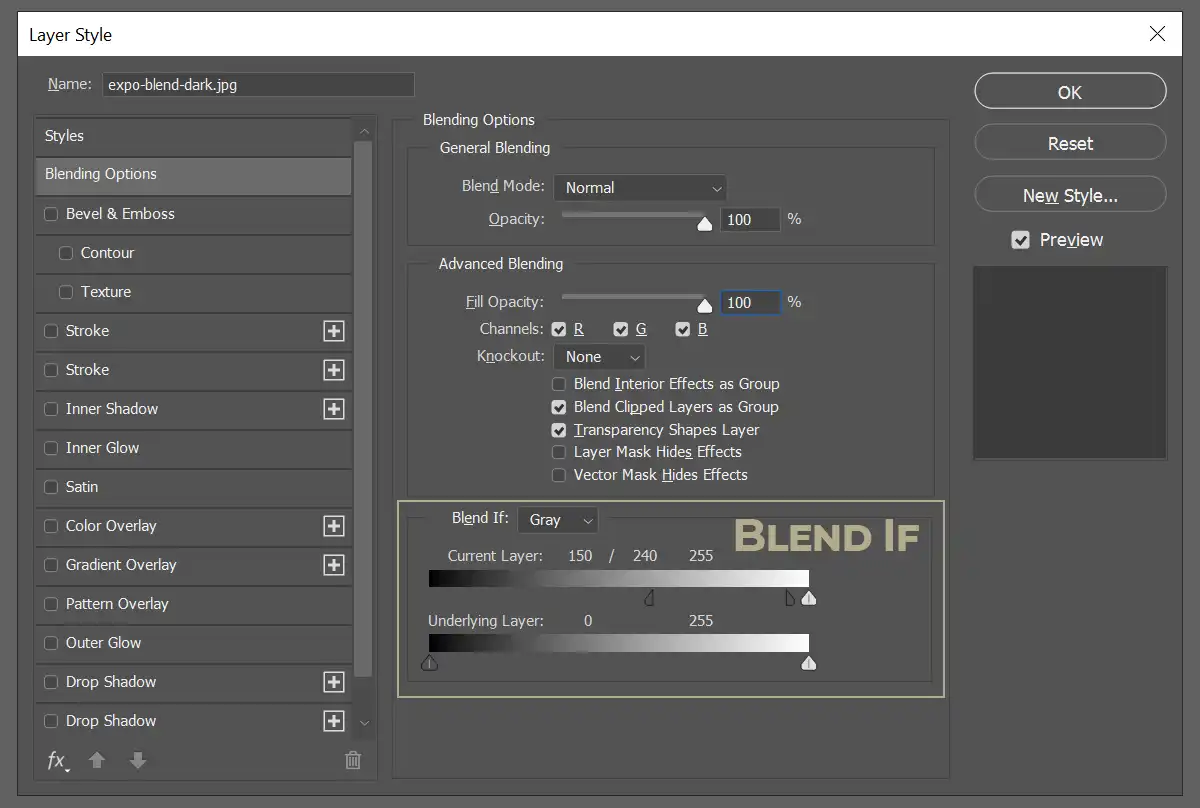
Exposure Blending
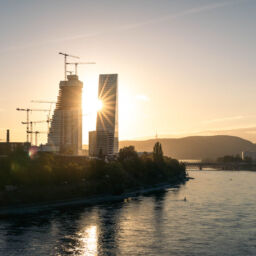
One use-case is exposure blending. This can be helpful if you do have a large dynamic range and took multiple exposures to cover it better. As a starting point, we have three exposures of the same scene.
First a brighter photograph to capture details and colors in the dark areas, but with the downside that very bright areas are overexposed (e.g. the sky). Second, a medium exposure where the overall brightness is balanced, but both shadows and highlights don’t have a lot of detail. And third a darker exposure where details are lost in the shadows, but all the colors in the sky are retained.
Again, if you want to follow along, you can download the sample images here. Just open them in photoshop and stack them on top of each other. The brightest at the bottom, then mid, then dark.
Turn off the visibility of the top two layers, so that we only see at the brightest one on the bottom of the layer stack . The sky is clearly overexposed. Now turn the visibility of the second image on, you can now see some yellow tones at the horizon, but the shadows are way too dark. Let’s use “Blend-If” on the darker of the two exposures to get the best of both images.
The idea is, that we want the darker exposure to be shown, where it is already bright, while we want to keep the shadows from the brighter exposure. In this case you can apply Blend-If either on the current layer, or the underlying layer. If you feel experimental, why not try to combine both? For demonstration purposes, I am going to use “Blend-If” on the current layer. Once your’e satisfied with the blend of the medium exposure, turn on the top layer and again use Blend-if to bring back the colors in the sky, while not losing the details in the shadows. Below is the before and after along with the settings I used.
You will note, that the result is darker and has less contrast. However, it now contains both the details from the shadows, as well as the beautiful colors in the sky. For me, this is a good starting point to do further edits.
I wrote a blogpost about exposure blending by using the “Apply Image” command. I find the results with “apply image” are at least as good, and combining it with “Blend-If” is even better. Have a look and see what you like best!
Targeted contrast enhancement
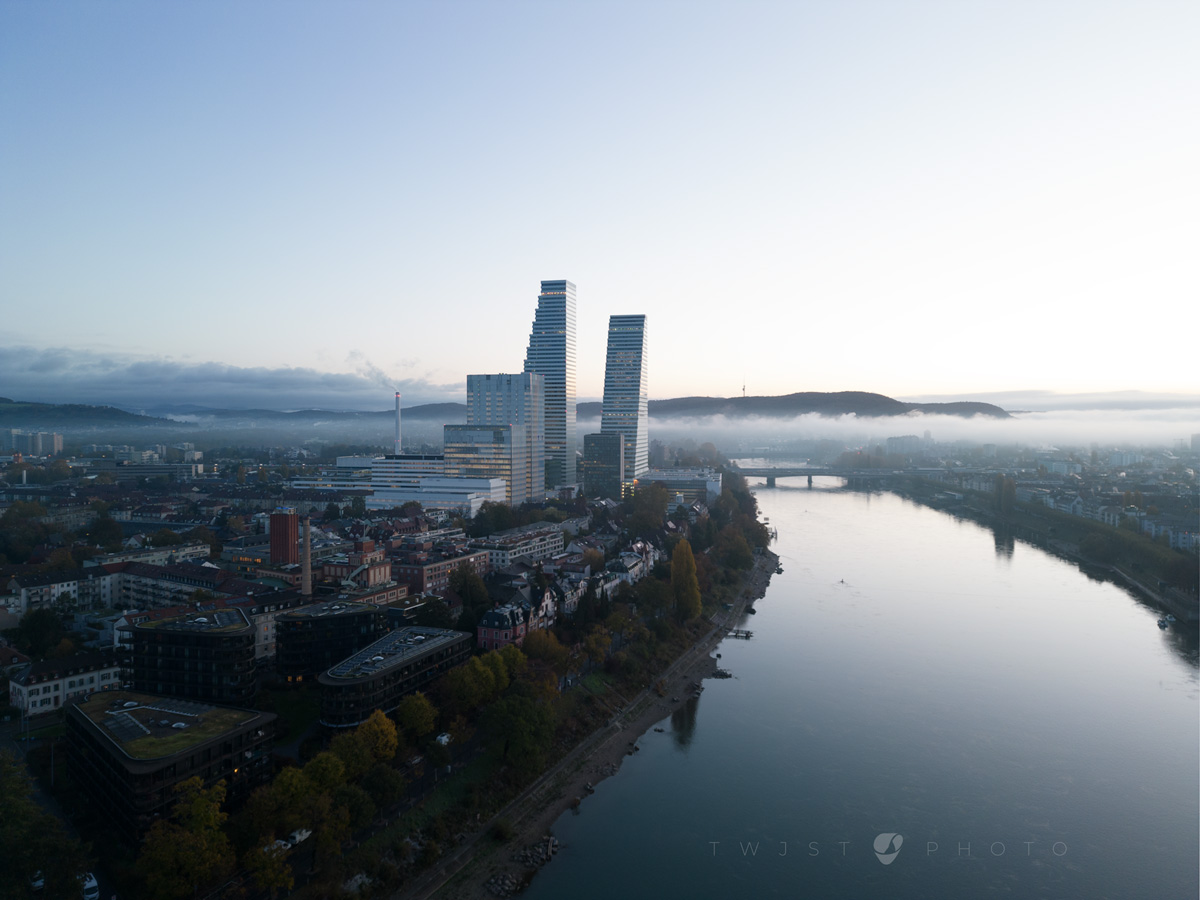
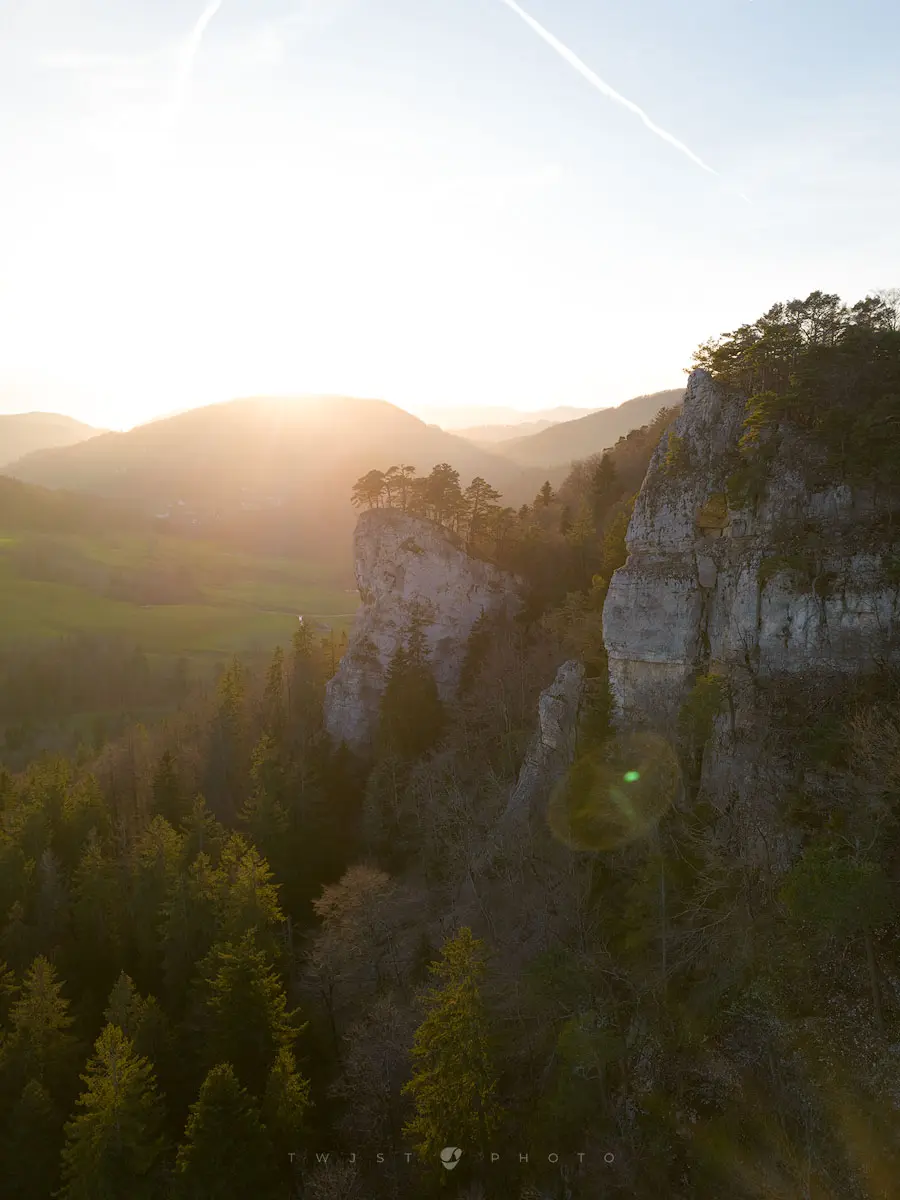
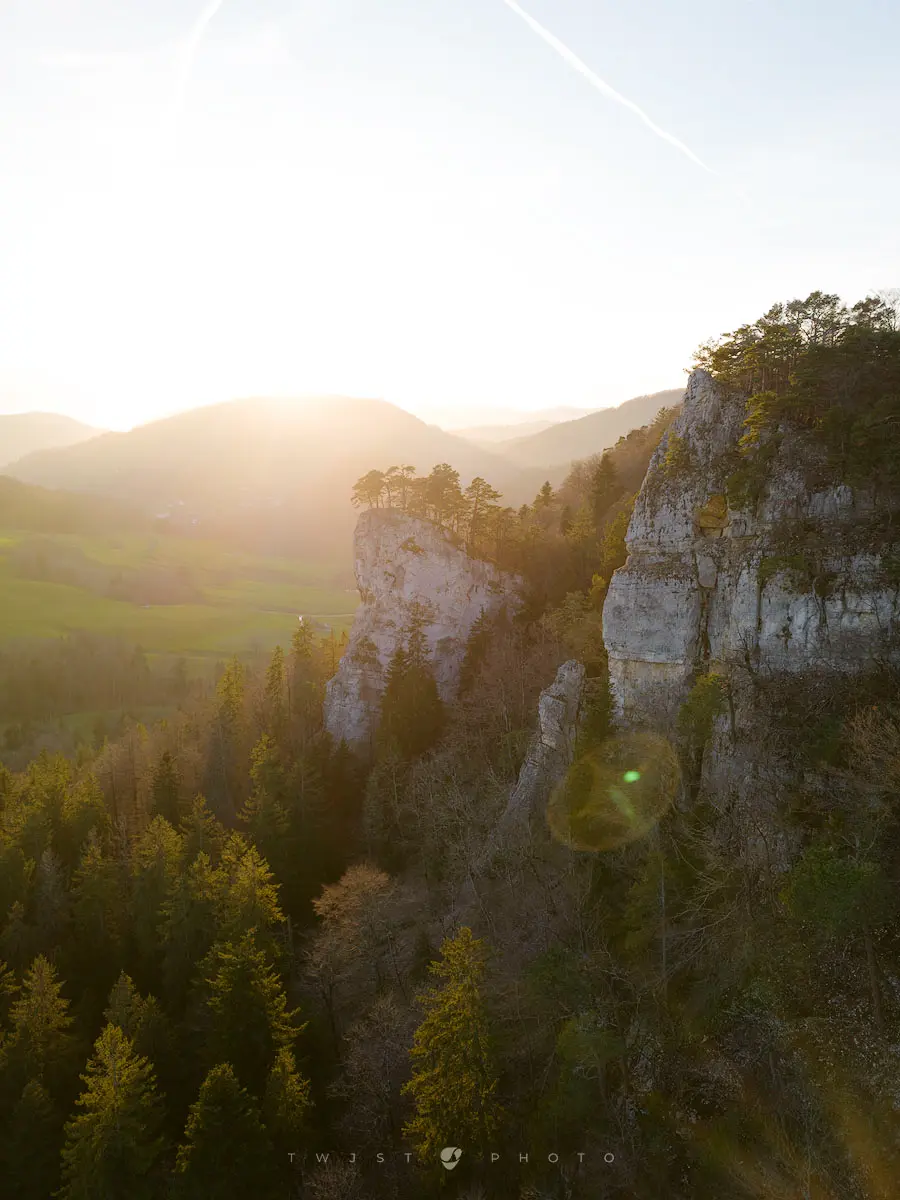
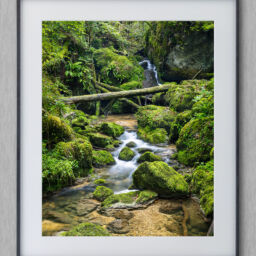
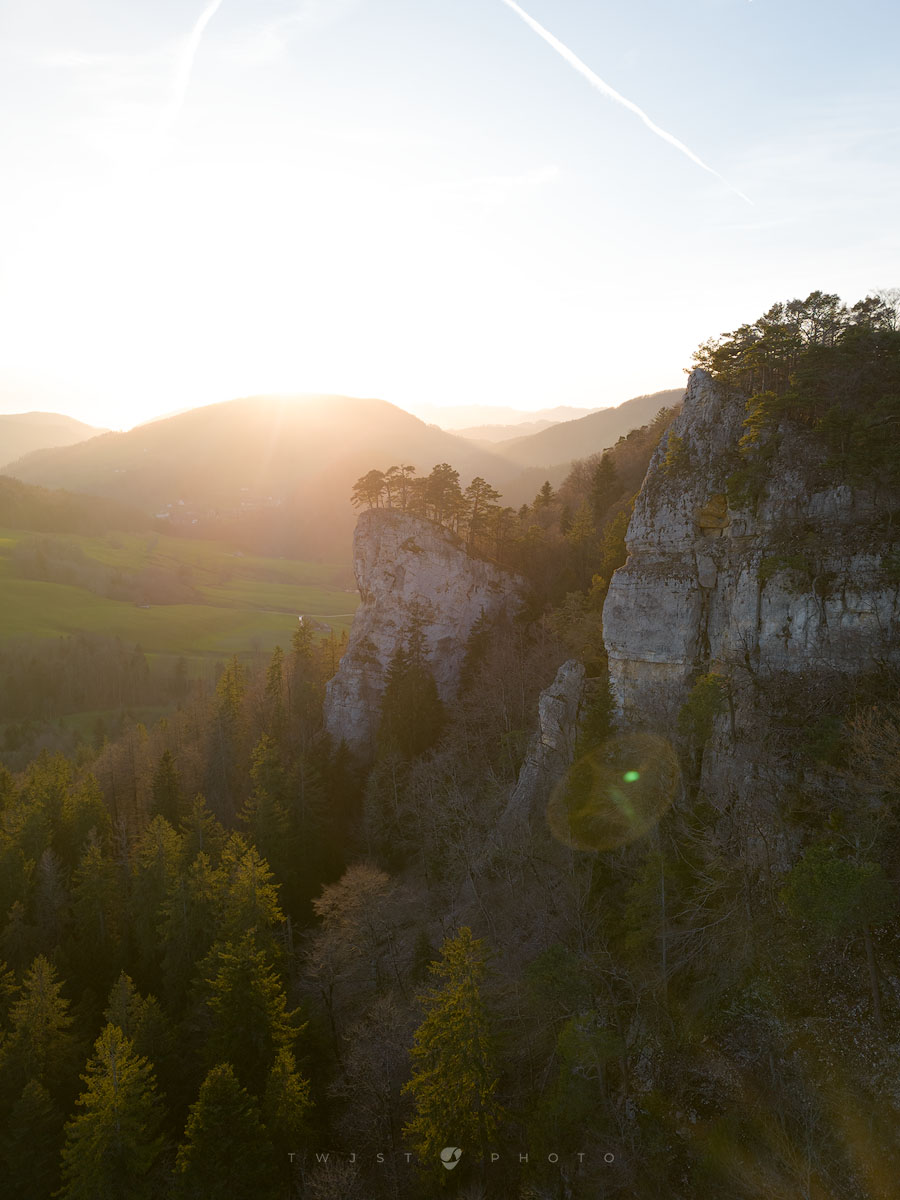
On to the second use case: Targeted contrast enhancements. If you apply adjustments on your image globally, it may well be that it benefits one part of the image, while creating problems in another. Blend-If can help you to make your adjustment more targeted. Again, if you want to follow along, here is the base image that I’m going to use for the next part.
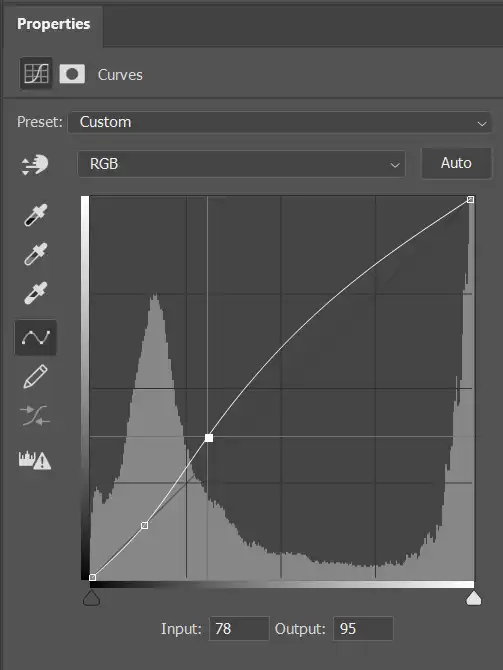
Let’s have a look at this base image, and let’s say I want to enhance the light shining through the trees surrounding the rock in the center of the image. For this I would add a curve adjustment layer on top and modify it in order to enhance contrast.
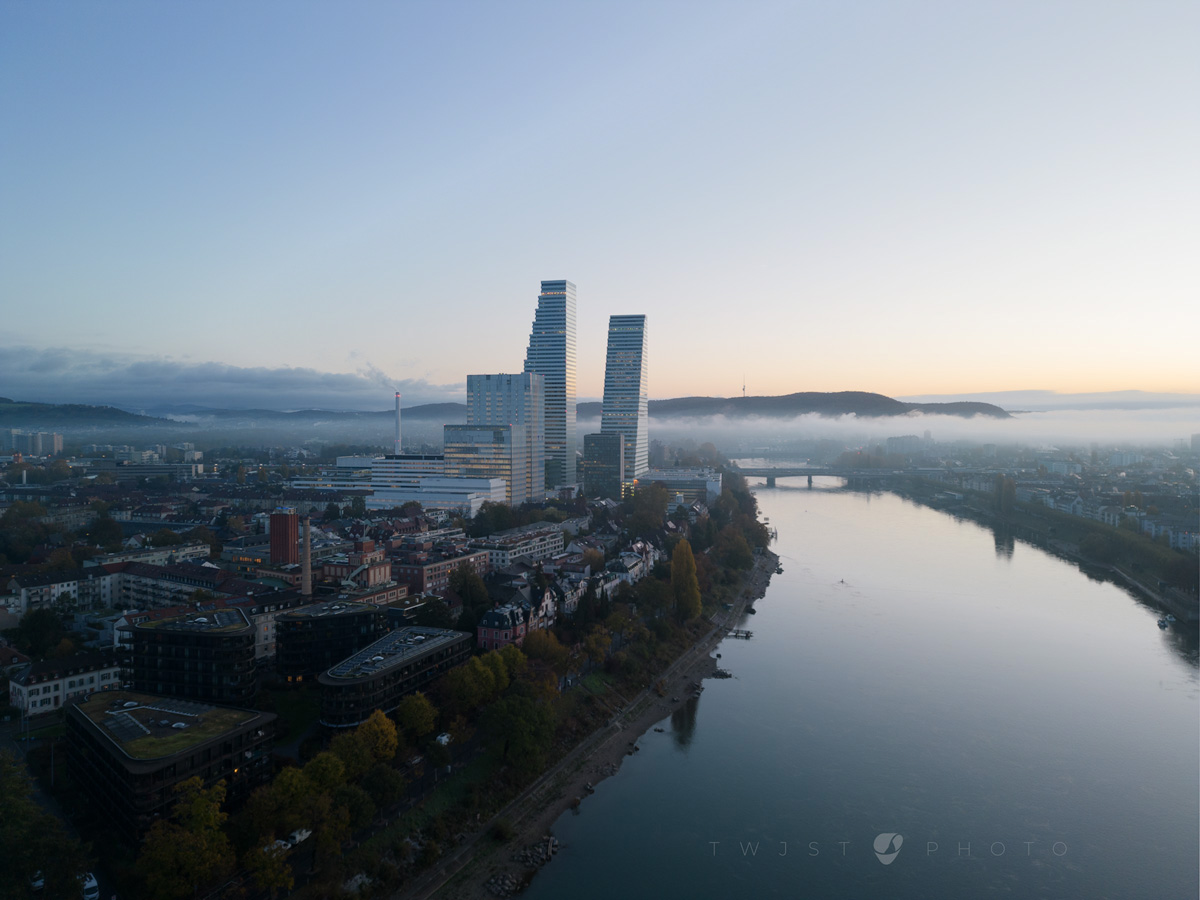
While this image may immediately seem more attractive, this global adjustment creates some problems too. The sky is already very bright, and by adding more brightness to it, we lose details and color. In addition, I find the whole right side to be too prominent now, distracting from the main subject – the prominent rock in the middle of the frame..
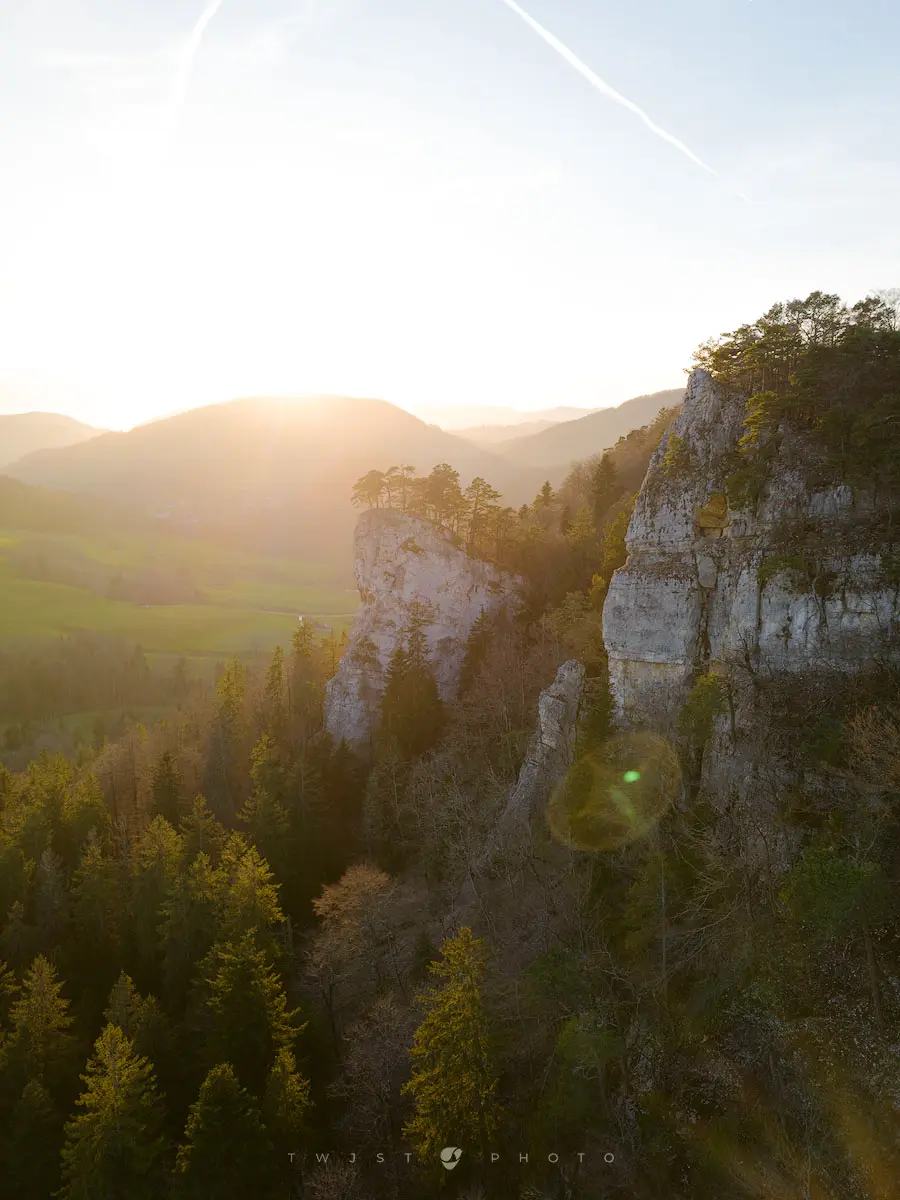
Let’s add some blend-if to this adjustment. Since we only wanted to affect the trees around the central rock, there is no need for the curve to apply to the much brighter background. We can achieve this by limiting the effect to the darker parts of the image. The result is more subtle and we protected the sky of blowing out more. However, the problem of the right hand side of the image still being too prominent persists.
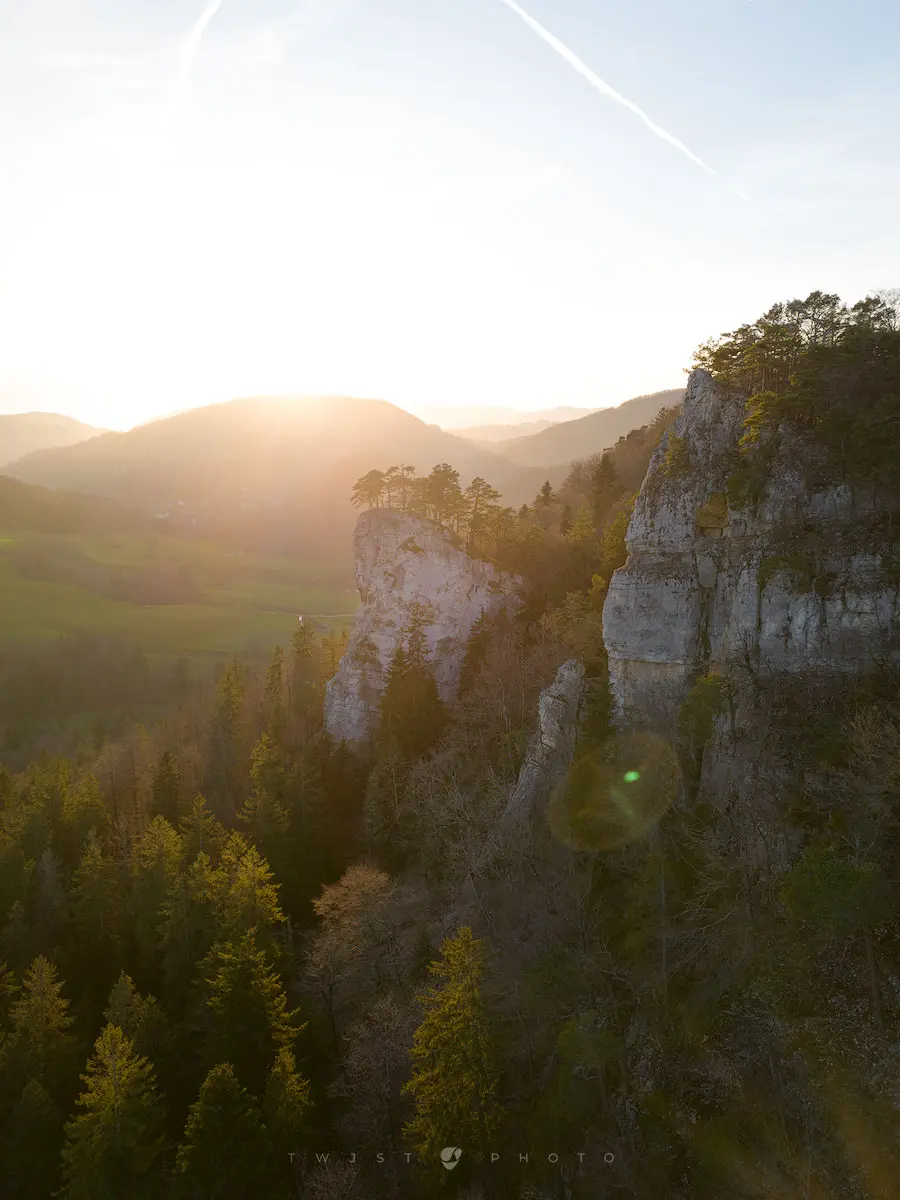
If we now further restrict the adjustment by a layer mask, we can control the effect very well to only apply where we want it to take effect. To make this easy, I turn the layer mask of the adjustment black, and then gradually paint in the effect with a soft white brush on the layer mask. The result on the right hand side is much more subtle than at the start, but we achieved what we aimed to do without creating new issues along in the process.
On top of this, I would add further adjustments to develop the image step by step. Hopefully you can appreciate what level of control the combination of different tools in Photoshop can offer. The combination of layer masks and Blend-If is one I use all of the time.
Color Grading
The third and last effect which I am going to present here is color grading. There are many tools which are useful here, Lightroom Classic has a very powerful tool available. But also here, Blend-If can be used to get specific effects.
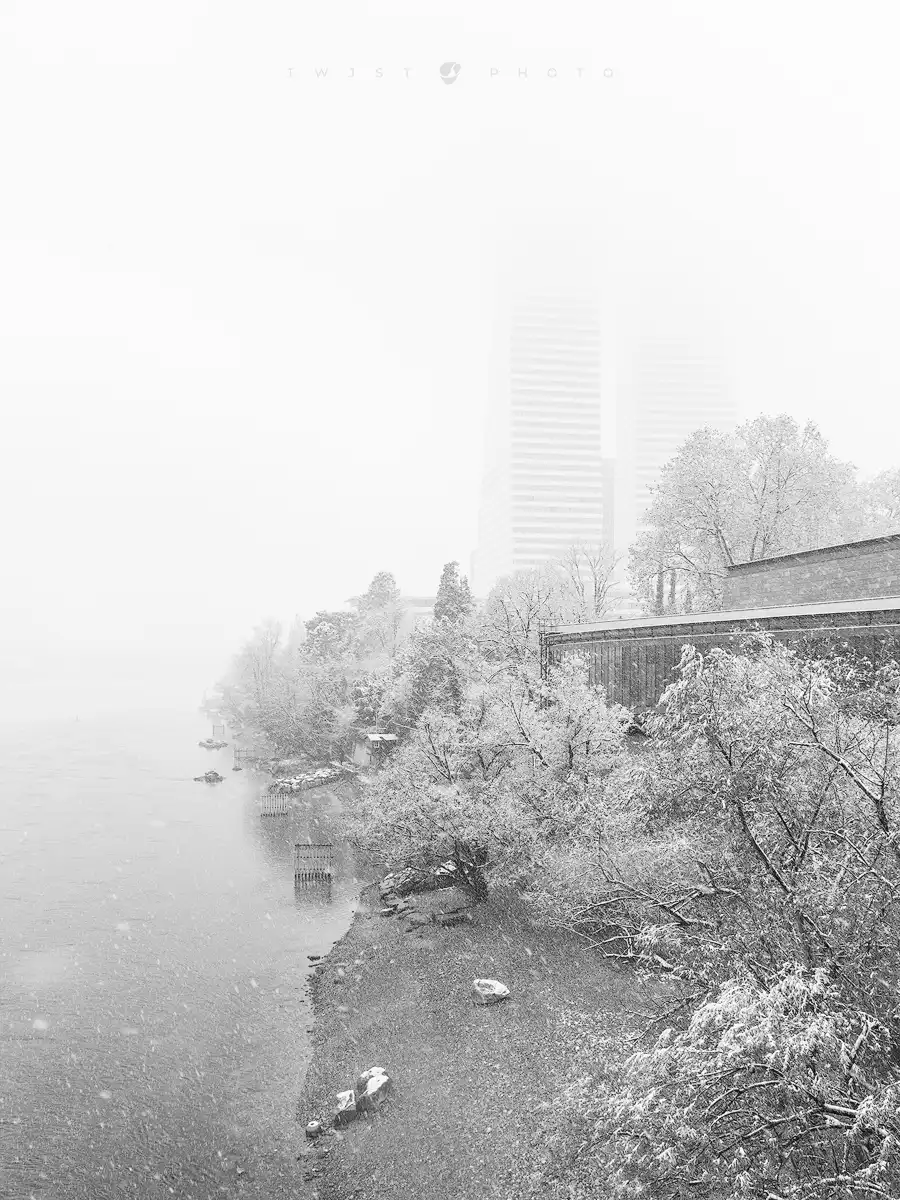
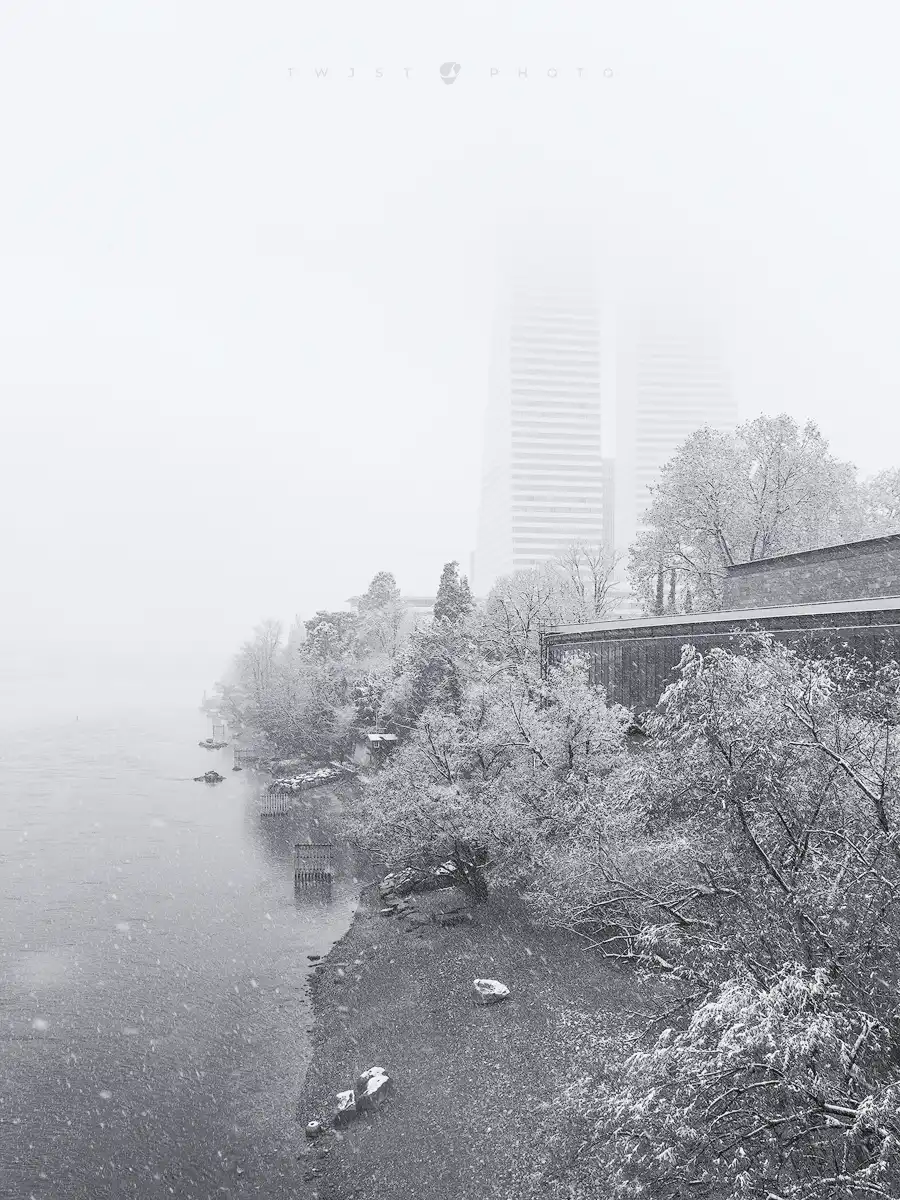
For demonstration purposes, I will be using a black and white image, which you can download here in case you want to follow along. Why start with black and white image? Because like this we start literally from neutral ground, the image does not contain any color whatsoever. Any color in the result stems solely from our effect.
As always, you can go down a million ways which are all valid. What I chose to do was a cold color grade with a little bit more contrast. If you look at the color graded image only, you could think that it’s still black and white. However, if you compare the two directly, the blue tones in the resulting image become very obvious.
How did I get there? I just added two solid color adjustment layers on top of the black and white image. The first having a dark blue (#17152a) and the second a light blue (#dce1f9).
Blend-If on the first one is splitting both sliders to the max (0 / 255 and 0 / 255), layer opacity at 68%. Blend if on the second one is 78 / 255 on the dark slider, while the white slider stays at 255, layer opacity at 17%. Noticed how I describe the Blend-If? The four numbers describe the position of the separate handles, they are always shown above the blend-if bar.
How did I end up with these crazy numbers? I simply played around with different settings until the result looked appealing to me. Go and try for yourself! What happens if you change colors? What if you change their brightness? And how do blend-if settings change the effect?
Other Possibilities
As mentioned at the start, the possibilities how to use “Blend-If” in Photoshop are almost endless. For example, you could use the concepts learned above to tone done a distracting element. Add an adjustment which lowers luminosity and contrast, then use blend-if to limit it to the luminosity range of the distracting part, and third, paint it in locally via layer mask to just affect this part of the image.
Can you think of another cool use-case? If so, please let me and everybody else know in the comments below.
Step by Step
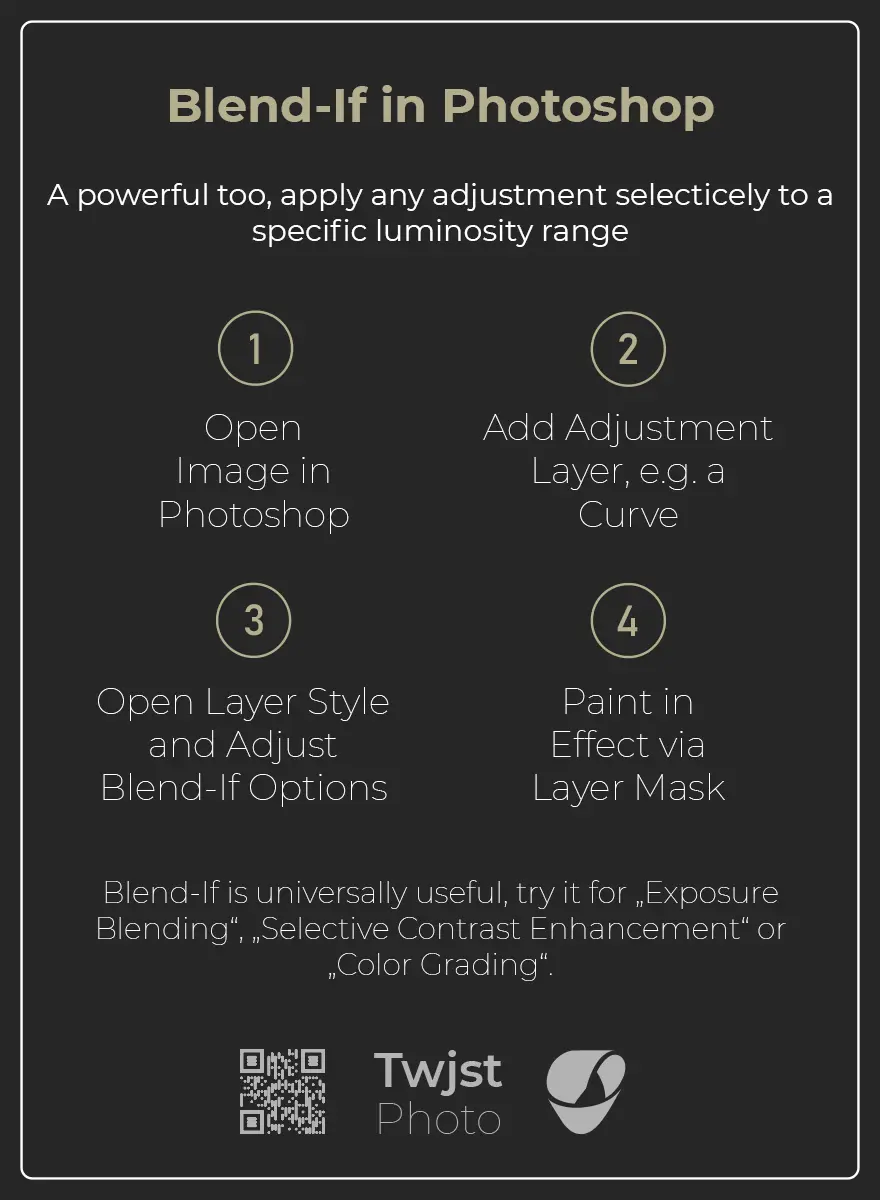
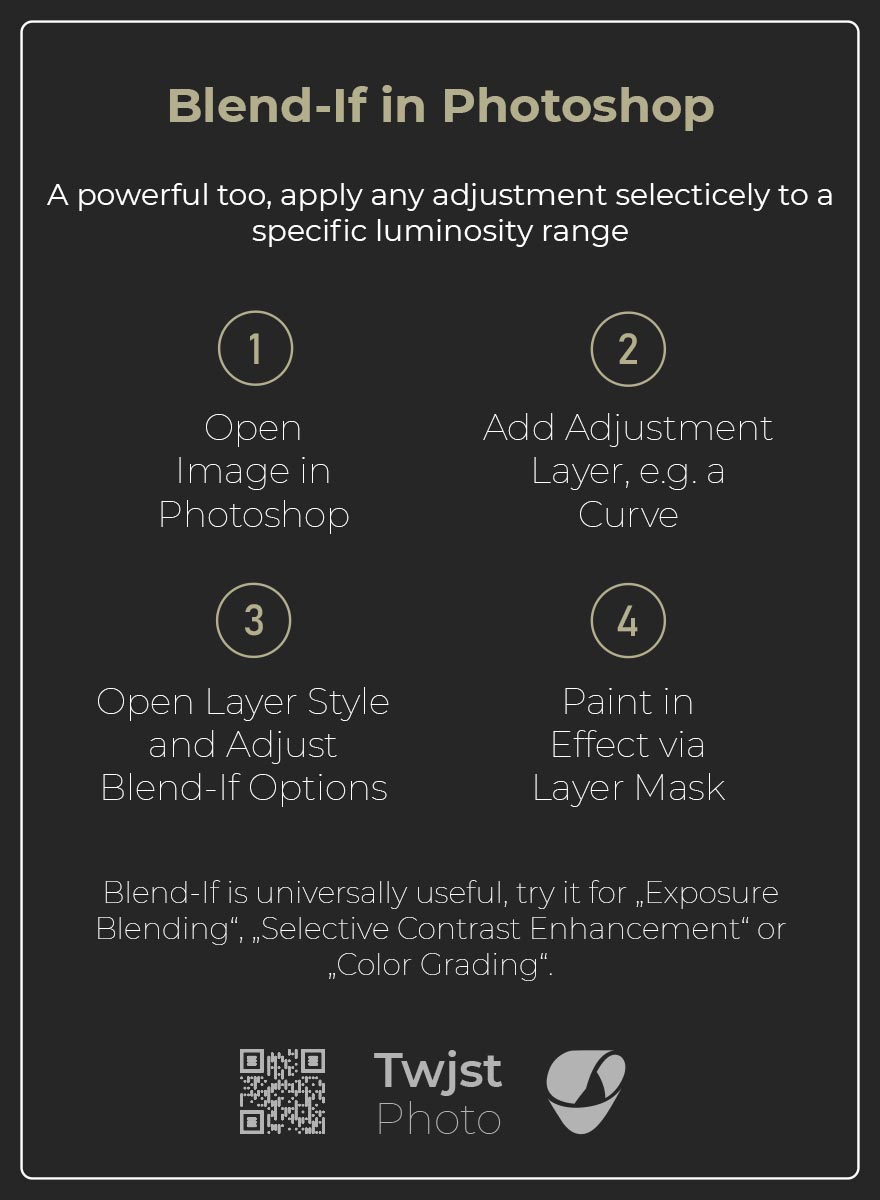
Let us now summarize how we can apply Blend-If in Photoshop
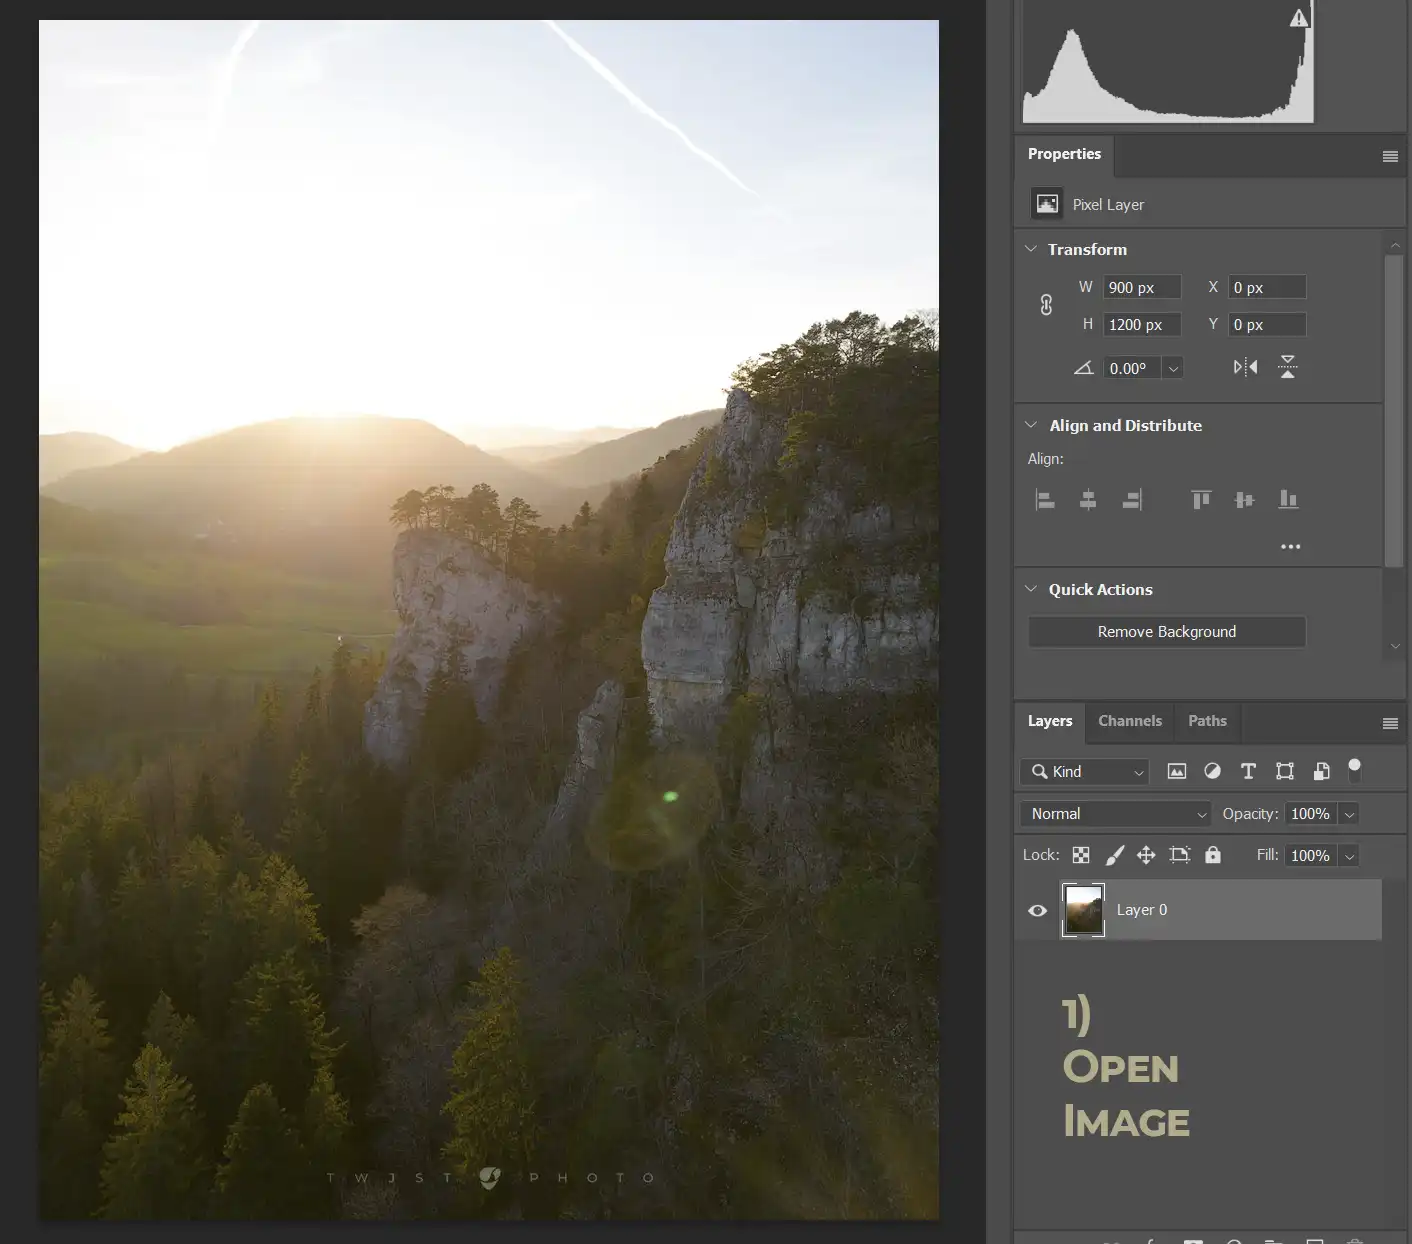
Step 1 – Open an Image
Open the image you want to edit in Photoshop
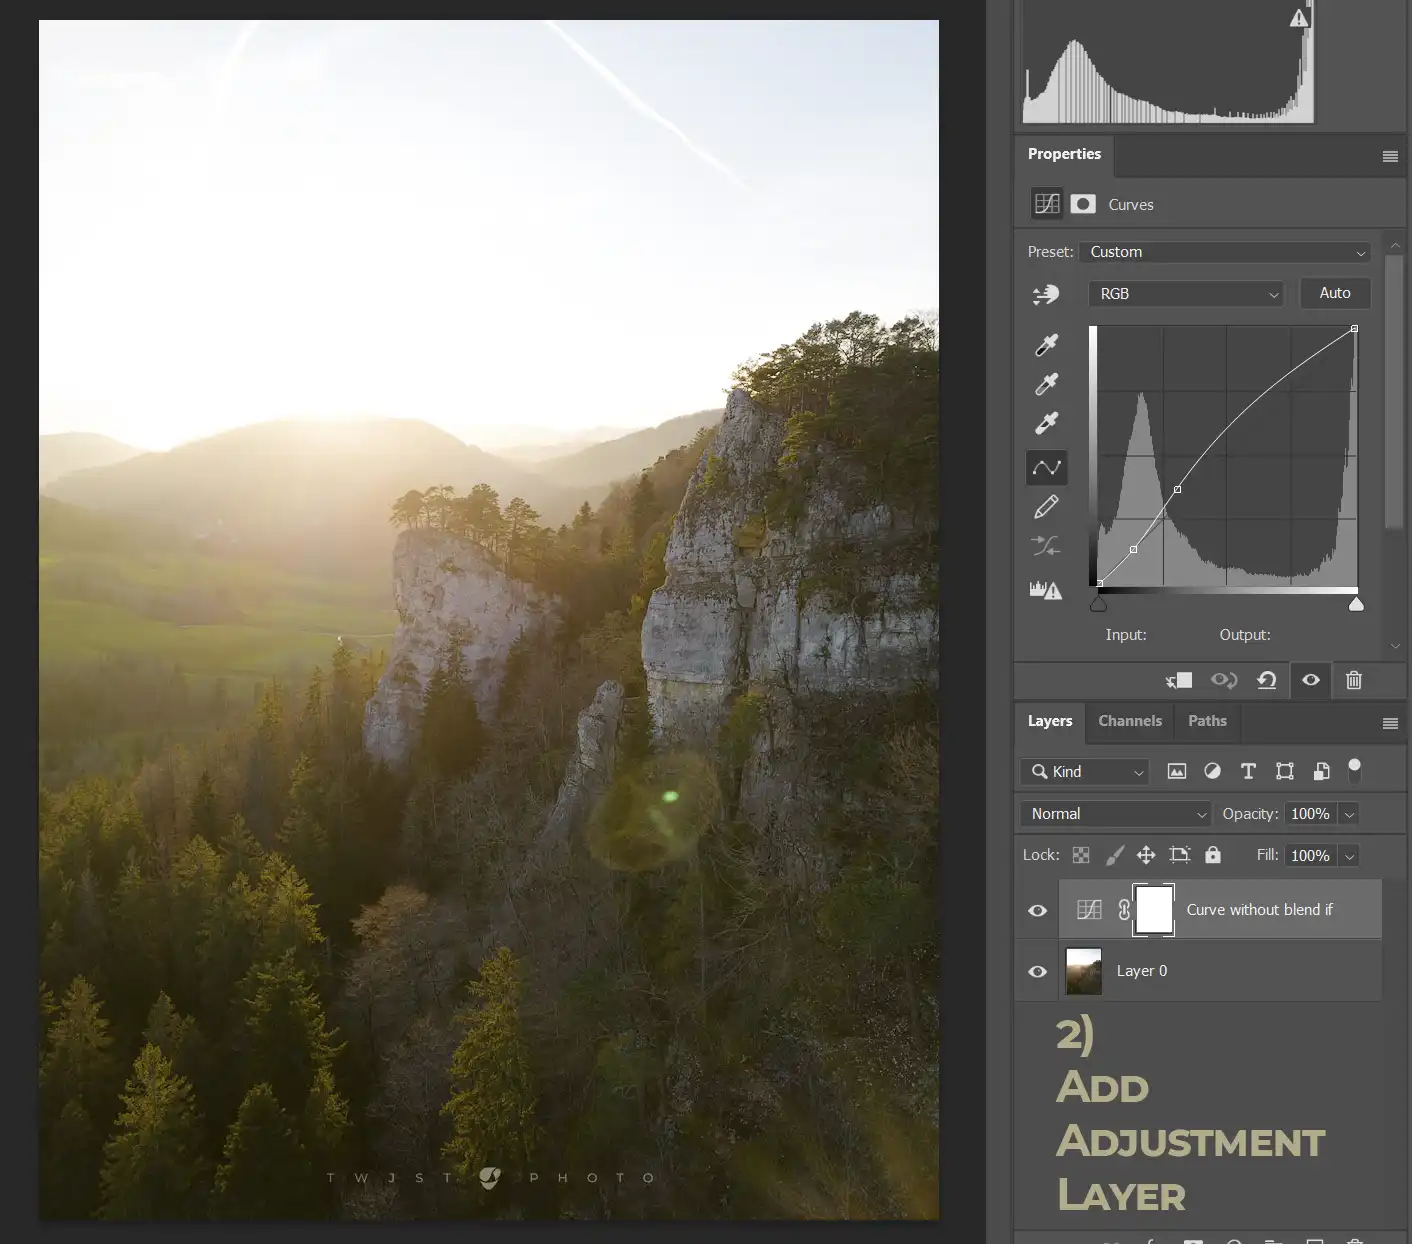
Step 2 – add Adjustment layer
Now add an adjustment layer on top, for example a curve. Modify the curve until the part of the image you want to edit looks fine. Ignore for now if other parts of the image look worse.
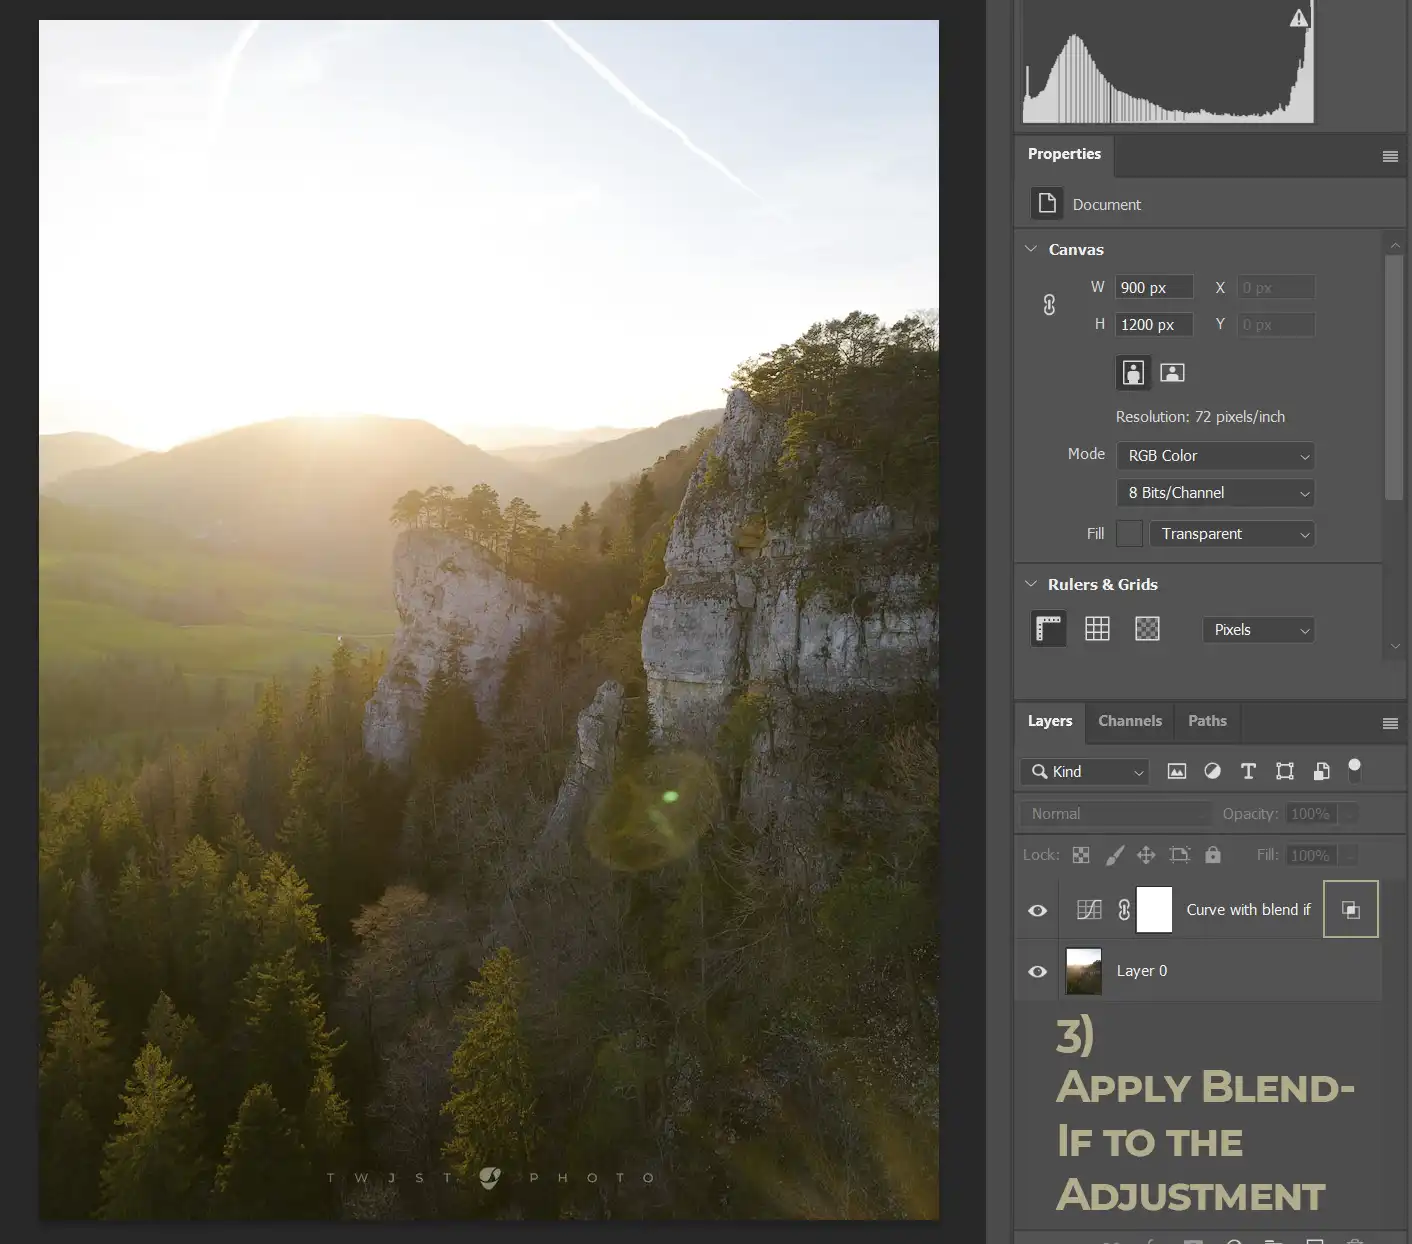
Step 3 – Open Layer Style and adjust Blend-If
Now double click on the right side of the adjustment layer to open the “Layer Style” Dialogue. In there, adjust the “Blend-If” handles of the “underlying layer” until you narrow it down to the luminance range of the part you want to affect. Then break the handles by holding “Alt” while dragging to create a transition range. This will avoid artefacts and make the adjustment more natural.
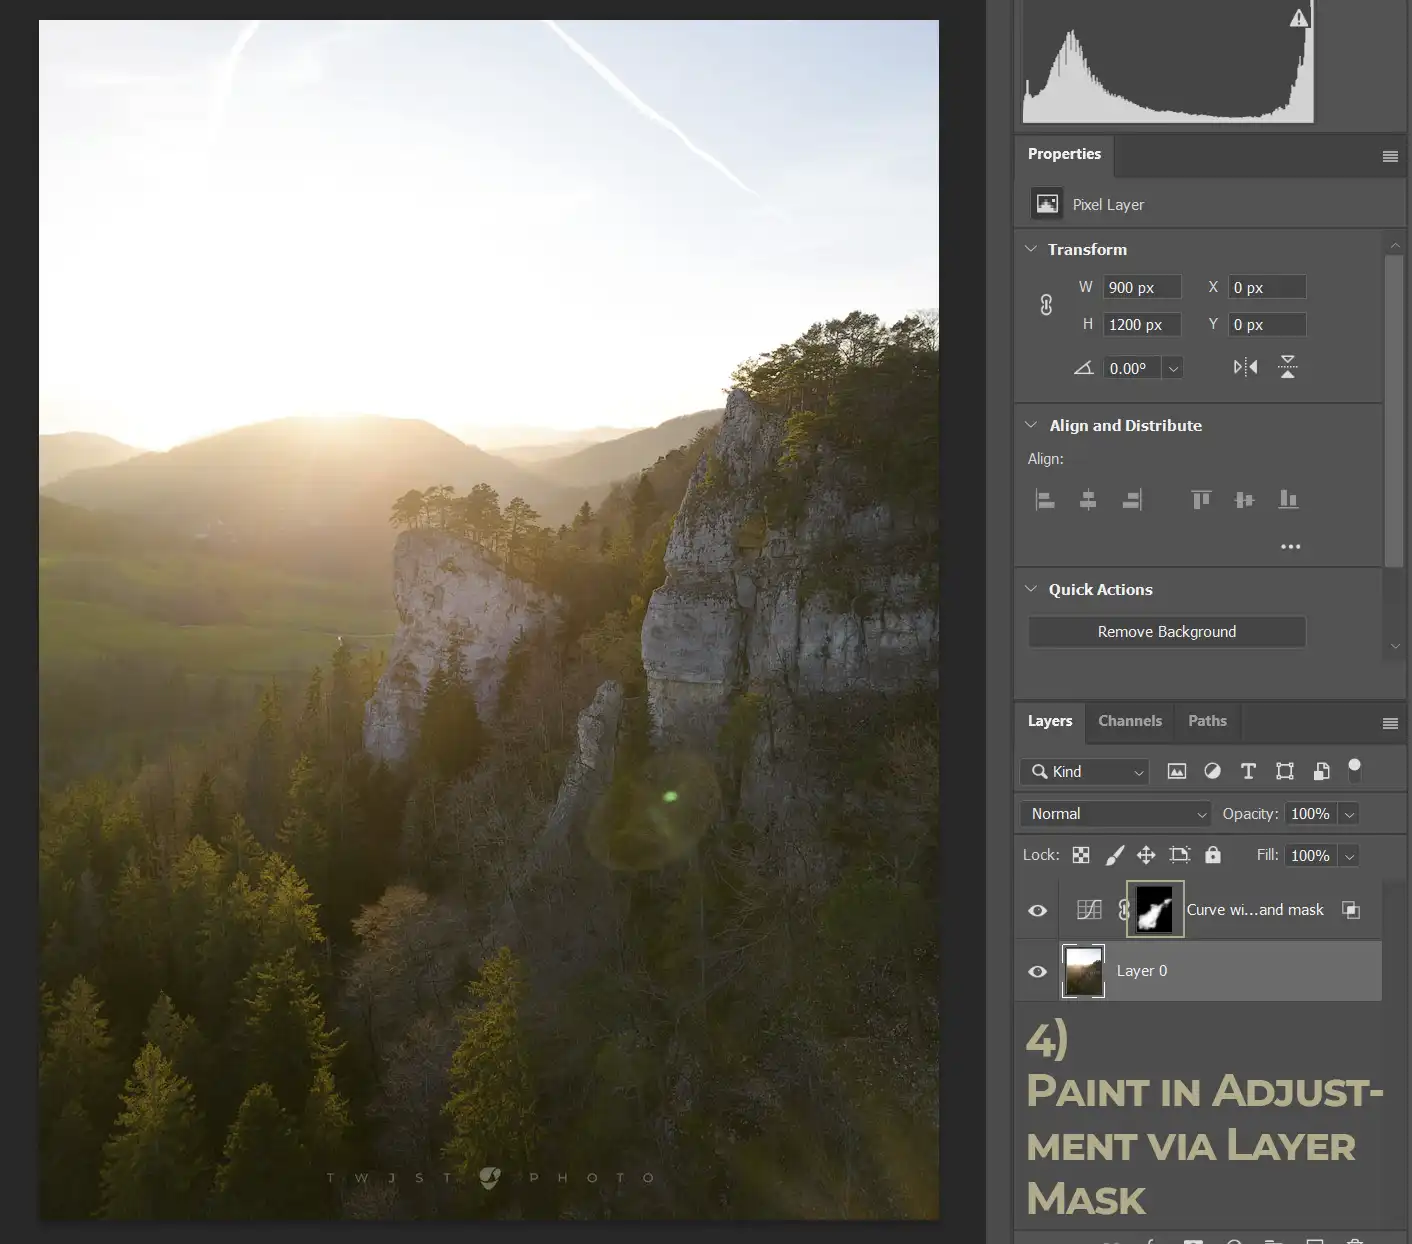
Step 4 – Paint in Effect via Layer mask
If there are still parts of the image affected, that you don’t want, then you can limit the effect further with a layer mask. Invert the white layer mask to black, and then start painting in the effect with a soft white brush to exactly where you want it to be.
All done!
That’s pretty much all that there is to it, you used Blend-If and a layer mask to make a targeted adjustment to your photograph.
Cheat Sheet
🎉Tadaaaa, there you go. You are most welcome 🙂
You can download a jpg version of the cheat sheet right here. If you like this tutorial, please let me know in the comments below.
Did you like this Tutorial?
I hope it proves useful and you can take something with you. Let me know below if you have any questions, comments, or suggestions – or share directly on social media.

I liked the tutorial. Good descriptions of the fully masked to not masked transitions and the feathering between. The example images are also useful to follow along and the examples are clear. It was also a good reminder that you can use layer masks on the blend if layer to further modify effects.
Thanks Don, your feedback is much appreciated!
Hello! Just want to congratulate for these amazing tutorials: they’re precise and extremely useful… I’m no photoshop geek and by following you hints I could obtain very nice results for my pictures! Well done and thank you for sharing your knowledge!