I did it: a Handheld Time-Lapse
I created a time-lapse of a sunrise in Basel. The rather unusual thing is that I combined single handheld images while walking along the Wettsteinbridge!
This is my first ever video on Instagram – apart from all the stories. It’s the result of a bigger personal project where I attempted to shoot a time-lapse while walking. In this post I’ll show you what my idea was, how I planned it, how I shot it, and how I put it together in the end.
If this post was helpful to you or you simply like what you see please leave a comment down below. Also, please head over to my Instagram account @twj.st, I truly appreciate a like and a comment. If this is more your jam than a blog, consider following me there!
The Idea
Almost every morning I cross the Wettsteinbridge in Basel on my way to work – so does my wife. She is usually a bit earlier on the road than me and noted that the sun was rising between the two Roche towers.
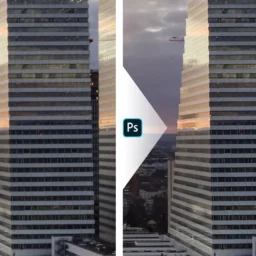
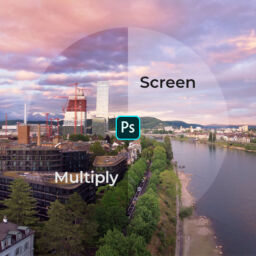
So of course, I made sure to get on my bike earlier and had a look what the scenery had to offer – and I was not disappointed. I wanted the sun to just peek from behind building one (the right side tower in the image below), so I could get a nice sun star. Then during dinner the next day, we discussed the idea further and it developed into whether I could eventually take multiple images for a time-lapse. Could I keep the sun at the rim of the building while it was rising?
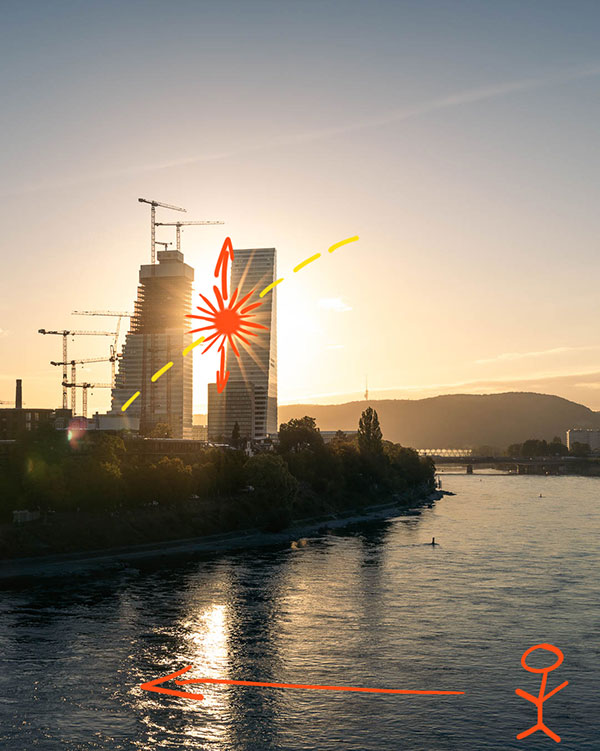
This image illustrates my idea. The yellow dotted line represents the approximate path of the sun during sunrise. The concept is, that if I were to continuously move to the left, I could keep the sun at the rim of the tower while it was rising.
However, my experience up to this point was putting the camera on a tripod in a fixed spot and let it do an automated time-lapse. Could I do it manually – and even worse: handheld while walking along the Wettsteinbridge? I had no idea whether this idea was doomed to fail or would live up to what I had in mind…
But I liked it enough to give it a try!
The Plan
Right, time to make a plan. Since a while I have PhotoPills installed on my phone. For taking landscape photographs which depend on sun, moon, and the stars I find it is super useful. While I spent a little bit of money on it, I’m not regretting it one bit: worth every penny!
Using PhotoPills I easily determined during what timeframe the sun would be behind the Roche tower while standing on the Wettsteinbridge.
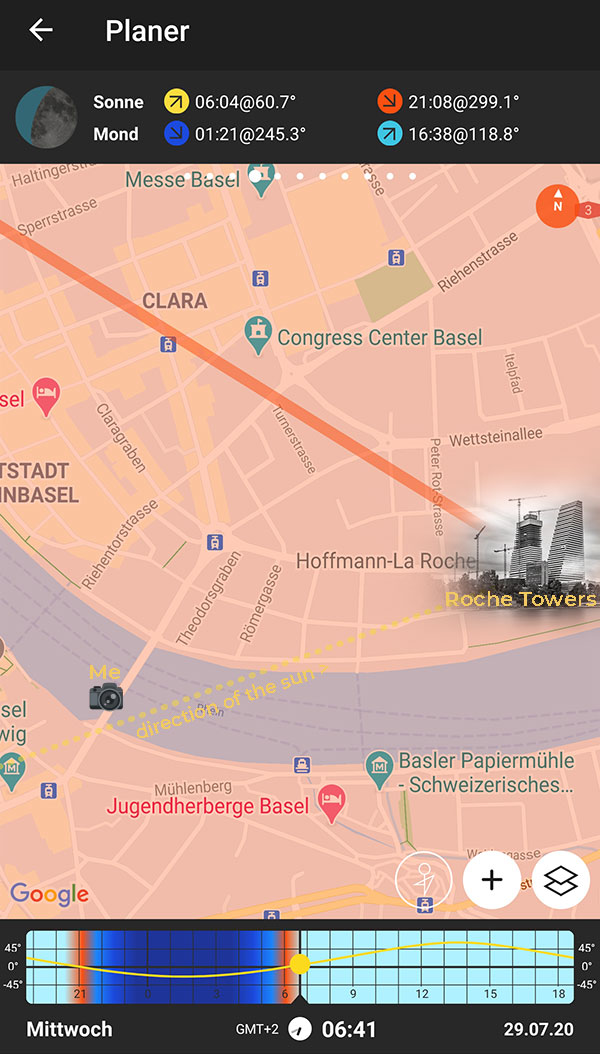
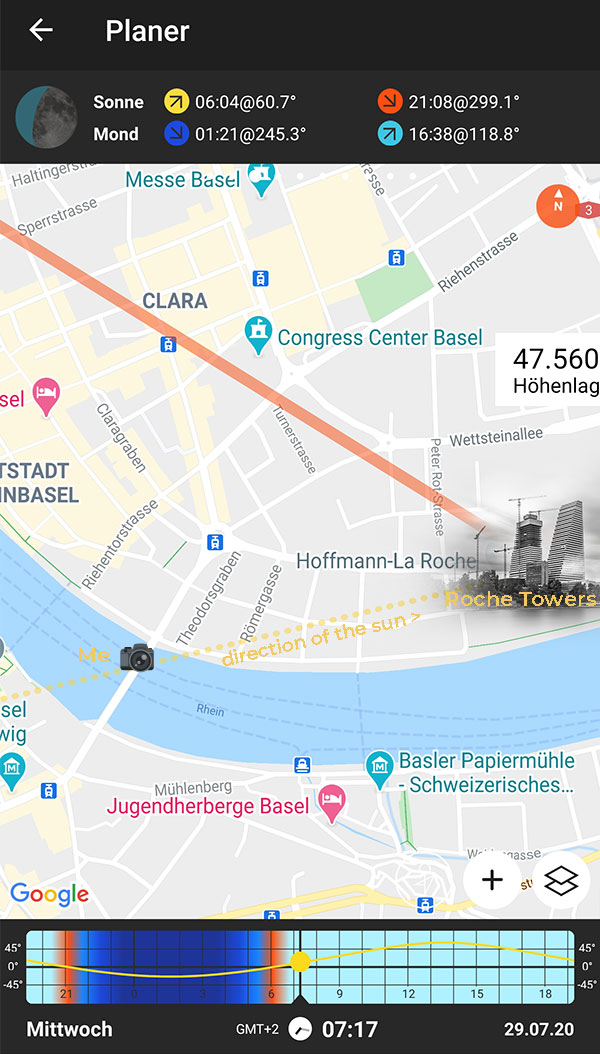
The annotated screenshots above should give you an idea how I did this. First I placed the needle on the Roche tower. By adjusting the time, I could easily see when the sun was aligning with the building while looking at it from the Wettsteinbridge (yellow dotted line).
Like this I found out, that starting at 06:40 until about 07:20 I would be able to see the sun peeking from behind building 1. Of course, I had to move along, the bridge during this time in order to keep this perspective.
The Shoot
Maybe obvious, but of course I had to make sure I was on site early enough. Not always easy, but totally worth it for this endeavour.
Gear and Settings
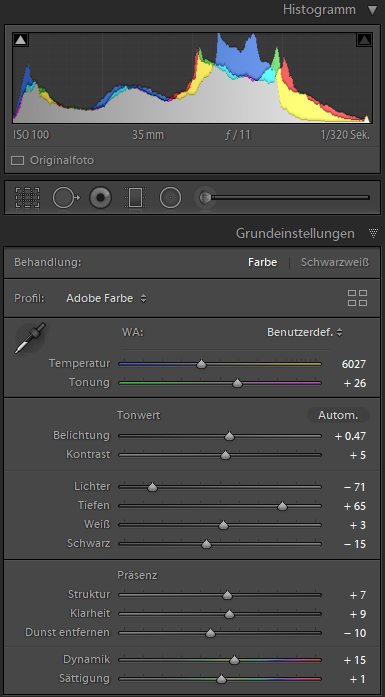
I used my Canon EOS R together with my EF24-70mm f/2.8 II USM. Images were taken at 35 mm to capture the breath of the scene, f/11 to make sure I get a nice sun star and ISO 100 for maximum quality. An exposure time of 1/320 to 1/500 of a second were needed for a correct exposure and ensured I could easily hand hold the shots.
I tried to make sure not to change the zoom, otherwise it would be very tricky to correct for it later. But of course I managed to screw this up and so my first 10 images had a slightly different field of view… 🙄 I also attempted to have the camera as level as possible and I aligned the top left edge of the building with something in my viewfinder. The idea was, that this would ensure a more constant view along the bridge and easier alignment of the images later on.
All in all, I took 144 images between 06:41 and 07:17 which means 1 shot every 15 seconds. This was surely not precise, but I hoped good enough. In the middle of it someone even asked me whether I could take a picture of him, which I unfortunately had to reject. The world was not about to stop turning 😄
Putting it all together
Basic Adjustments in Lightroom
After getting home in the evening, I imported all the images into Adobe Lightroom. This is the software I use since many years to catalogue and edit my images. For this project I created a separate catalogue since I did not want those images mixed in with my other photographs.
Once I imported them all I chose a representative image somewhere in the middle of the series. I made some basic adjustments until I was happy with the look. My overall exposure was rather on the low side to protect the highlights – therefore I raised the exposure first. Then due to the high dynamic range, I lowered the highlights considerably while lifting the shadows. You can find the details in the given screenshot if you are interested.
This work I only had to do once, because after this edit I synchronized those settings to all the other images. As a last step, I made sure the exposure on all the frames was the same. Lightroom has a nice little shortcut for this: select all the images and press Ctrl + Shift + Alt + M (very intuitive, isn’t it? 😉).
With this I was ready to align the individual pictures. And so I opened batches of 10 images as layers in photoshop.
Aligning in Photoshop
The process you see below is very time consuming. If you know a better – or especially a faster way – please let me know asap! I would be extremely interested to learn about it. 🙂
Is this the best way?
I was using Photoshop, my second go to application for photography. It comes in a bundle with Lightroom and they both work fairly well together. While Photoshop has a “align layers” option, I figured that this was not very good for my project. The option not only aligns images, but also distorts them if it sees it as necessary. Since I could not load all the images into photoshop at once and the perspective was constantly changing due to my movement I thought this would not be good for the video later.
Photoshop Guides
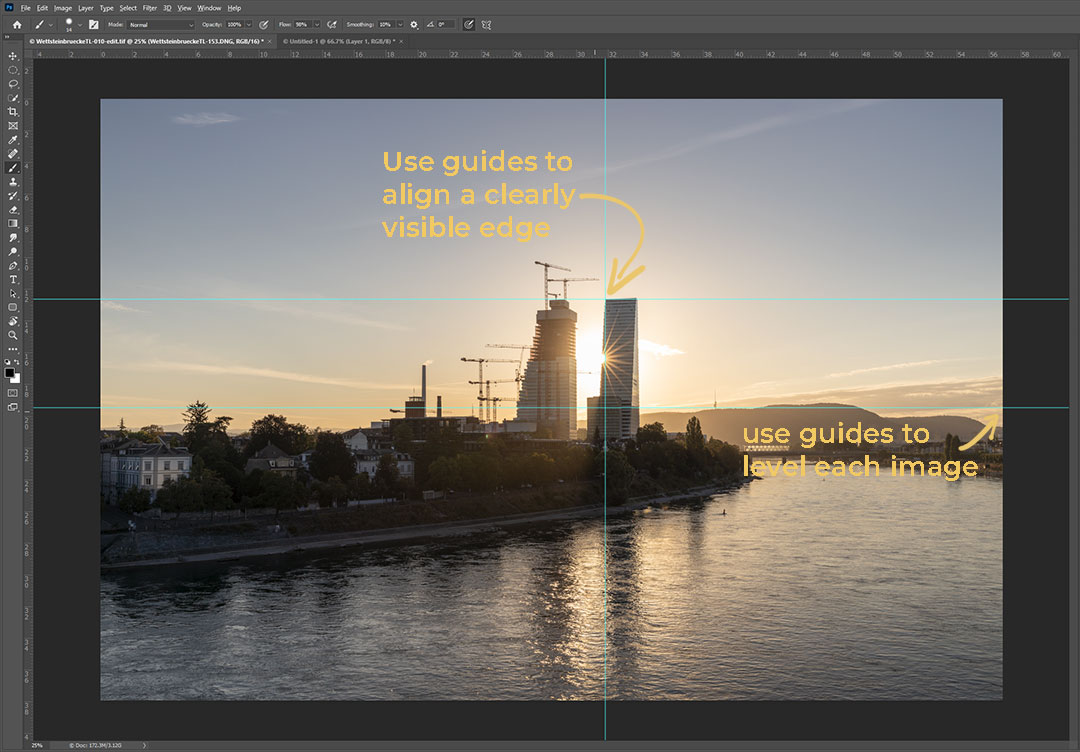
Photoshop guides to the rescue: That’s what I used to align my images. You can add as many guides as you want by clicking on “View” -> “New Guide…”. While any layer can be moved by the “Move Tool” (press V), if you want to rotate them in order to level them you can use “Transform” (press Ctrl + T).
With a layer selected and in “Transform Mode” I used two intersecting guides to align the top left edge of building 1 in the exact same place of every image. The edge is easily recognizable in the images and can be aligned precisely. A bit harder is to make sure the images are level. For this I used a second horizontal guide and rotated the layer until something along the edges of the frame was level – like a building with a level roof.
Is this a perfect method? Not at all, I guess any professional video person gets pimples by just looking at my footage 🙈 But that’s the best I could do within the multiple hours spent to align each and every image.
Export each Image
As a last step, I had to export the aligned layers to allow putting them together in a video. While there are several methods to export multiple layers as individual images, most of the results were not properly picked up by my video software and had horrible colors.
Choose the right method to export multiple layers as image!
The only method that worked for me was to select multiple layers, then right click and choose “Export as…”. In the following dialogue I chose “convert to sRGB” and “embed color profile”. With this I was all set to combine them into a video.
Creating the Time-Lapse Video in DaVinci Resolve
Last but not least I had to combine all those images into a video. While Adobe of course also has a program for video creation, I am not producing a lot of them and the price for this additional software is simply out of proportion for what I want to do. Therefore, I turned to the free version of DaVinci Resolve, which I find absolutely awesome. If you want to try it out yourself check the requirements first, since it demands a beefy computer.
This part was really easy – I just dragged and dropped all the adjusted images into my media pool, which DaVinci Resolve automatically combined into a video. After a few more adjustments I looked at a video of only 6 seconds 🙁 I was slightly disappointed, but of course this had to be expected with 24 frames per second. Therefore, I decided to go “Boomerang style”: I copied the video I just created, appended it to the first one and let it run in reverse 😃.
The Result and Conclusion
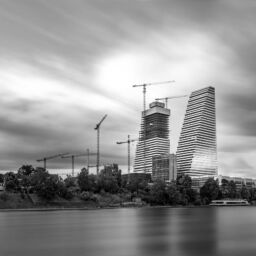
So, in the end I did it! I created a handheld time-lapse of a sunrise in Basel. How do you like it?
Is it perfect? Not by a long shot: if I wanted it to be better, I probably would have to spend many more hours perfectly aligning all the images. And I can assure you, I already spent a lot of hours to get to this result. However, that the concept worked, and I got a rising sun star along the rim of the Roche tower makes me smile when I look at it. 😊
How could I do this better and easier the next time? To use a phone or something like a GoPro to record a video instead of single images would be a possibility, but they usually have a very wide-angle view and lack an aperture which produce a lovely sun star. Also, the quality is not the same. Remember: I had single images with 30 MP each in hand for this video 😎
But it is time to learn about the video capabilities of my EOS R. I must learn what possibilities the camera has to offer, how long I can record etc. Recording in 4K comes with a hefty crop – maybe for this case my 16mm wide angle lens would be good enough? And a gimbal could stabilize the recording…
Do you have any experience with this which could help me? I’d really appreciate any input!
Your Opinion
Thank you for making it this far into my blogpost, I appreciate it ❤! Let me know how you like it – or what I should do different – by leaving a comment below. What would you like me to write about next?